При работе в браузере Google Chrome пользователи могут столкнуться с такой проблемой, когда вместо загрузки нужной страницы на экране появляется сообщение об ошибке ERR_CACHE_MISS. К этому может привести одна из причин, которые рассмотрены ниже, поэтому необходимо выполнять каждый из предложенных шагов, чтобы выяснить, на каком этапе вылетает ошибка. Итак, выясняем, как же обычному пользователю можно исправить ошибку ERR_CACHE_MISS.

Содержание
- Причины появления ошибки ERR_CACHE_MISS
- Как вернуться к нормальной работе Google Chrome после вылета ошибки ERR_CACHE_MISS
- Очистим кэш Google Chrome
- Путь к избавлению от ошибки ERR_CACHE_MISS через командную строку
- Исправим ошибку ERR_CACHE_MISS при помощи обновления браузера
- Попробуем устранить ошибку ERR_CACHE_MISS путем отключения всех расширений
- Перезапустим сетевое оборудование
- Переустановим браузер для ликвидации ошибки ERR_CACHE_MISS
Причины появления ошибки ERR_CACHE_MISS
Среди причин появления ошибки ERR_CACHE_MISS пользователи отмечают следующие:
- неспособность браузера занести в кэш открываемое приложение либо страницу;
- активная работа Adblock и других расширений, блокирующих рекламу в Google Chrome;
- некоторые баги в самом браузере;
- сбой настроек.
В любом случае, для того чтобы искать решение, необходимо сначала найти причину ошибки ERR_CACHE_MISS. С первого взгляда это сделать не удастся, поэтому нужно запастись терпением и тщательно проработать предложенные ниже шаги. На каком-либо из этапов решение обязательно найдется.
Как вернуться к нормальной работе Google Chrome после вылета ошибки ERR_CACHE_MISS
Итак, начинаем подробно разбирать причины появления ошибки ERR_CACHE_MISS и осуществлять определенные действия, чтобы от нее избавиться. Простейший шаг в данной ситуации – очистка кэша.
Очистим кэш Google Chrome
Чтобы очистить кэш, выполните следующее:
- посмотрите в правый верхний угол браузера и найдите три точки, стоящие вертикально;
- нажмите на них и выберите пункт “Настройки” – они откроются в новой вкладке;
- нам нужны дополнительные настройки – они раскрываются при нажатии на слово “Дополнительные” внизу страницы;
- в разделе “Конфиденциальность и безопасность” будет пункт “Очистить историю”, на который и нужно нажать;
- в открывшемся меню выберите время, за которое необходимо выполнить очистку, и установите флажки, если нужные вам окошки не активированы;
- в данном окне снова нажмите на “Очистить историю”.

Все, кэш очищен. Этот шаг решил вашу проблему? Продолжайте работу в любимом браузере. Если же ошибка ERR_CACHE_MISS продолжает вылетать, предпримем следующее.
Путь к избавлению от ошибки ERR_CACHE_MISS через командную строку
Вызовите командную строку (администратор) способом, подходящим для вашей ОС. Вводите поочередно следующие команды, подтверждая каждую из них нажатием на Enter:
- ipconfig /release;
- ipconfig /all;
- ipconfig /flushdns;
- ipconfig /renew;
- netsh int ip set dns;
- netsh winsock reset.

Командная строка (администратор)
После последнего нажатия Enter перезагрузите ПК, чтобы внесенные в систему изменения вступили в силу. Проверьте, решилась ли проблема – откройте в Google Chrome любой сайт. Если ошибка ERR_CACHE_MISS до сих пор присутствует, сделайте то, что предлагается далее.
Исправим ошибку ERR_CACHE_MISS при помощи обновления браузера
Попробуем обновить браузер. Снова заходим в настройки и ищем пункт “Справка”. Слева выплывет меню, в котором нужно нажать на “О браузере Google Chrome”. Если обозреватель нуждается в обновлении, то оно начнет устанавливаться автоматически. После окончания операции вам предложат перезапустить браузер, чтобы завершить установку обновлений.

Попробуем устранить ошибку ERR_CACHE_MISS путем отключения всех расширений
Чтобы избавиться от ошибки ERR_CACHE_MISS, можно еще отключить все расширения, действующие в браузере. Для этого снова зайдите в настройки и наведите курсор на “Дополнительные инструменты”. В открывшемся слева окошке нажмите на пункт “Расширения”. Снимите флажки во всех окошечках и таким образом отключите все (!) расширения. Перезапустите браузер и проверьте, продолжает ли возникать проблема.

Перезапустим сетевое оборудование
Если оборудование, с помощью которого осуществляется доступ в Сеть (роутер, модем) работает долгое время без перерыва, это может вызывать сбои в соединении. Как еще один из способов избавления от ошибки ERR_CACHE_MISS попробуем перезапуск устройства. Отключите ваше оборудование от питания, затем снова запустите его. Проверьте, выскакивает ли ошибка. Если да, то нужно применить крайний способ.
Переустановим браузер для ликвидации ошибки ERR_CACHE_MISS
Для начала удалим Google Chrome с компьютера. Деинсталляция браузера должна быть полной. То есть не ограничимся одним только удалением софта через меню “Программы и компоненты”, так как остаточные файлы могут остаться в реестре системы. Для их полной ликвидации используем какой-нибудь деинсталлятор (например, Revo Uninstaller) или редактор реестра Windows. После завершения операции перезагрузим ПК и заново скачаем браузер с официального сайта или установим с диска.
На каком-либо шаге вы обязательно сможете самостоятельно избавиться от ошибки ERR_CACHE_MISS.
-
Категория ~
Что делать (ошибки и проблемы) -
– Автор:
Игорь (Администратор)
В рамках данной заметки, я расскажу вам что представляет собой ошибка ERR_CACHE_MISS или «Confirm Form Resubmission / This site can’t be loaded from the cache / Failed to load resource: net::ERR_CACHE_MISS», а так же как ее исправить. И начну с определения.
Причины ошибки ERR_CACHE_MISS
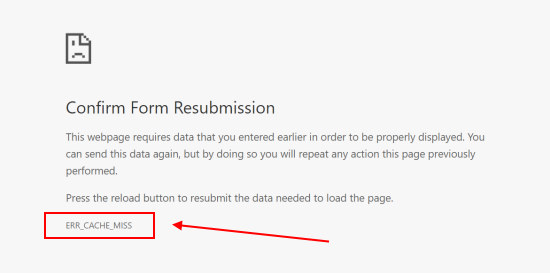
Если говорить простыми словами, то ошибка ERR_CACHE_MISS означает, что у браузера возникли проблемы с использованием кэша веб-страницы или отдельной части. В техническом же плане ситуация несколько сложней. Во-первых, баг может возникать из-за поврежденных файлов кэша самого браузера. Во-вторых, это могут быть проблемы с тем, что в кэше сохраняется информация, которая вызывает или может вызвать конфликты с веб-сайтом. Например, данные форм. И еще ряд моментов.
Но, не будем более углубляться в детали.
Тем не менее, важное примечание, о котором стоит знать каждому, так как это может приводить к проблемам! Если вы используете переходы по истории в браузере (на предыдущую / следующую страницу), то ошибка ERR_CACHE_MISS с фразой «Confirm Form Resubmission» может возникать из-за того, что пользователь пытается открыть страницу, которая была сформирована в результате отправки данных форм веб-сайту.
Как это выглядит, человеческим языком:
1. Пользователь открыл страницу page1, в которой были некие поля для ввода данных.
2. Пользователь заполнил поля, нажал кнопку и данные были отправлены серверу сайта, после чего была сформирована некэшируемая страница page2 на основе POST запроса (означает, что страница зависит от данных из полей page1). Чисто технически это может быть та же самая page1, только не с GET запросом, а с POST, но для понимания сейчас это не столь важно.
3. Пользователь переходит в страницу page3.
Если после этого пользователь нажмет кнопку «открыть предыдущую страницу» (page2, шаг 2), то браузер столкнется со следующей проблемой. Дело в том, что страница не была сохранена в кэше и, соответственно, для ее формирования браузеру необходимо повторно отправить сайту те же самые данные, которые пользователь ввел в странице page1. Может казаться, что это не такая уж и проблема. Но, что если в этой странице пользователь отправлял какие-то финансовые данные или выполнял подобные действия? А быть может это была страница с созданием пользователя или еще много чего.
Соответственно, чтобы хоть как-то решить подобную проблему (отгородить пользователей от случайных переходов / повторных действий), браузеры ввели специальное предупреждение «Confirm Form Resubmission». В таком случае страница будет загружена только если пользователь самостоятельно нажмет кнопку «перезагрузить» (по сути, заново отправить данные)..
А теперь, перейдем к тому, что вы можете сделать собственными силами.
Как исправить ошибку ERR_CACHE_MISS?
1. Используйте перезагрузку страницы с очисткой кэша. В принципе, в браузерах существуют две комбинации клавиш «Ctrl + F5» и «Ctrl + R», которые должны позволять перезагружать веб-страницу с очисткой кэша. Однако, стоит понимать, что так происходит не всегда и не для всех случаев это подходит. Тем не менее, о методе стоит знать.
2. Очистить кэш браузера. В общем-то, ничего удивительного — если проблема в кэше, то стоит попробовать его очистить. Кстати, вот пара обзоров как это можно сделать в Яндекс Браузере и Google Chrome (в остальных браузерах действия примерно те же самые).
3. Отключить или настроить специфические расширения браузера. Некоторые расширения браузера могут влиять на загрузку данных с сайта. Поэтому было бы не плохо «поковыряться в них» и посмотреть изменится ли результат.
4. Через панель DevTools. Практически в каждом браузере существует специальная панель DevTools. В основном, она предназначена для опытных пользователей, но все же ей может пользоваться каждый. Если же говорить об ошибке ERR_CACHE_MISS, то с помощью панели можно загружать страницы с отключенным кэшированием (при этом панель должна оставаться открытой).
Как использовать панель DevTools? Откройте вкладку с сайтом. Нажмите комбинацию клавиш «Ctrl + Shift + I». В нижней части экрана появится панель DevTools, в ней необходимо перейти во вкладку «Сеть / Network», а затем установить галочку напротив пункта «Отключить кэш / Disable Cache». После чего веб-страницу нужно перезагрузить. При этом логика следующая: если панель будет оставаться открытой, то кэш будет отключен, если же панель закрыть, то кэширование будет происходить в соответствии с исходными настройками сайта и браузера.
Понравилась заметка? Тогда время подписываться в социальных сетях и делать репосты!
☕ Понравился обзор? Поделитесь с друзьями!
-

Ошибка ERR INTERNET DISCONNECTED как исправить?
Что делать (ошибки и проблемы) -

Ошибка ERR CONNECTION RESET как исправить?
Что делать (ошибки и проблемы) -

Ошибка ERR EMPTY RESPONSE как исправить?
Что делать (ошибки и проблемы) -

Не удается получить доступ к сайту, что делать?
Что делать (ошибки и проблемы) -

Сбой при конвертировании FAT32 в NTFS, что делать?
Что делать (ошибки и проблемы) -

Ошибка ERR BLOCKED BY RESPONSE как исправить?
Что делать (ошибки и проблемы)
Добавить комментарий / отзыв
Ошибка возникает при просмотре страницы в браузере. Часто она появляется у пользователей Google Chrome. Реже в других программах: в Яндекс браузере и Firefox.
Как правило, вместе с NET ERR CACHE MISS появляется сообщения «Confirm Form Resubmission» либо «This site can’t be loaded from the cache». Что переводится как «Подтвердите повторную отправку формы» и «Этот сайт не может быть загружен из кэша». Ниже разберем основные причины и способы исправления.
Содержание статьи
- Перед тем как начать
- Обновление браузера
- Очистка кэшированных данных
- Отключение системы кэширования
- Отключение расширений
- Сброс настроек сети
- Отключение повторной отправки формы
- Запуск диагностики и устранения неполадок
- Удаление нежелательных программ
- Закрытие других вкладок и приложений
- Сброс браузера
- Альтернативные методы устранения неполадки
- Комментарии пользователей
Перед тем как начать
Начните с простых способов устранения проблемы, нередко именно они оказываются эффективными.
- Для начала стоит убедиться, что интернет-соединение исправно. Сделать это можно на примере отправки интернет пакетов. При необходимости перезагрузите маршрутизатор, выключив его на 10 минут. Произойдет сброс сессии, что скорее всего исправит работу интернет-подключения.
- Если интернета нет и рядом с иконкой «монитора» на панели задач находится желтый знак, то убедитесь, что роутер включен, сетевой кабель не поврежден и плотно сидит в гнезде.

- Запустите принудительную очистку кэша страницы вместе с перезагрузкой, нажав «CTRL + R» или «CTRL + F5».
Обновление браузера
Ошибка может возникнуть по вине разработчиков. Например, если ранние релизы содержат неисправности и баги. Убедитесь, что используете последнюю версию веб-обозревателя.
Для обновления перейдите на официальный сайт, скачайте и установите предложенную на этом сайте версию. Посмотрите, решило ли это проблему.
Если вы используете Google Chrome, вы можете перейти по адресу chrome://settings/help. На странице вы найдете информацию о текущем состоянии и узнаете, нужно ли вам обновляться.

Нередко помогает полная деинсталляция браузера с последующей установкой. Для этого используйте программы «Your или Revo Uninstaller». Они полностью удалят программу, включая все остатки, что повысит эффективность процедуры.
Очистка кэшированных данных
Следует почистить кэш браузера. Если есть поврежденные файлы, то они способны стать причиной сбоя.
Этот метод работает для любого веб-обозревателя. Воспользуйтесь инструкцией ниже, чтобы удалить данные.
- Откройте обозреватель, и нажмите клавиши «CTRL + SHIFT + DELETE».
- Отметьте все пункты и нажмите кнопку «Удалить данные/Очистить».

- После окончания процедуры очистки, перезапустите обозреватель.
Отключение системы кэширования
Можно и вовсе отключить кэширование страницы через инструменты разработчиков прямо в браузере.
- Нажмите Ctrl + Shift + I, чтобы открыть инструмент для разработки.
- Переместитесь во вкладку «Network» и активируйте опцию «Disable Cache».

- Обновите страницу, нажав «CTRL + R», не закрывая при этом консоль разработки.
Кэширование будет отключено пока открыты инструменты разработчиков. При желании можно уменьшить размер окна, чтобы оно не мешало.
Отключение расширений
Некоторые дополнения влияют на работу браузера и вызывают сбои. Попробуйте загрузить страницу через режим инкогнито «CTRL + SHIFT + N». Если она будет работать, то очевидно причина в дополнениях.
Чтобы понять, какое расширение способствует возникновению ошибки ERR CACHE MISS, необходимо их поочередно отключать и проверять работу ресурса.
- Перейдите в меню настроек и выберите «Дополнительные инструменты» — «Расширения».

- Выключайте расширения по одному, одновременно проверяя работу сайта.
Прежде всего нужно выключить блокираторы рекламы, такие как, «Adguard» или «Adblock». Поскольку построенные по современным технологиям сайты, с ними могут работать нестабильно.
Сброс настроек сети
Неполадка может возникнуть из-за неправильной конфигурации DNS или сетевых настроек. Поэтому их необходимо сбросить.
Как это сделать:
- Найдите и запустите командную строку через «Пуск» или «Поиск».
- Затем в командной строке поочередно введите следующие команды с нажатием «Enter»:
- netsh winsock reset
- netsh int ip reset c:resetlog.txt
- netsh winhttp reset proxy
- ipconfig /flushdns

- Перезагрузите Windows и роутер, чтобы изменения вступили в силу.
Отключение повторной отправки формы
Попробуйте изменить поведение браузера, отключив функцию повторной отправки формы.
Действуйте по инструкции:
- Нажав по ярлыку веб-обозревателя войдите в свойства.
- Вставьте команду -disable-prompt-on-repost в конец поля объект после закрывающихся кавычек.

- Нажмите «Применить» и следом «Ок».
- Запустите обозреватель через отредактированный ярлык.
Запуск диагностики и устранения неполадок
Если есть проблемы с сетью, то запуск средства диагностики от них избавит.
- Щелкните правой мышкой по иконке монитора, расположенной рядом со временем на панели задач. Выберите «Диагностика неполадок».

- Следуя инструкциям мастера попробуйте устранить проблему.
Удаление нежелательных программ
Избавьтесь от нежелательных программ, которые могут влиять на работу браузера. Это различные панели инструментов, визуальные закладки, блокираторы спама и рекламы.
Для этих целей лучше использовать деинсталляторы, например, «IObit Uninstaller». Он не только удалит программу, но и найдет и очистит систему от ее остатков.

Также выполните проверку на вирусы с помощью сканеров и утилиты «Adw Cleaner».
Закрытие других вкладок и приложений
Убедитесь, что есть свободная оперативная память. Для этого запустите диспетчер задач нажатием «SHIFT + CTRL + ESC» и переместитесь в «Производительность». Память не должна быть полностью забита.

При необходимости закройте лишние вкладки и приложения для освобождения пространства.
Сброс браузера
Используйте способ в последнюю очередь, так как при выполнении этого сброса будет удалена вся сохраненная конфигурация веб-обозревателя.
Поскольку настройки и закладки будут утеряны, предварительно настройте синхронизацию с вашей учетной записью «Google». После сброса они автоматически восстановятся.
Сброс выполняется следующим образом:
- Войдите в панель настроек.
- В форме поиска введите «сброс» и воспользуйтесь данной функцией.

Способ универсален и действует во всех обозревателях.
Альтернативные методы устранения неполадки
- Если открываются все сайты, кроме одного, то скорее всего проблема в ресурсе, к которому вы подключаетесь. Разработчики могли внести изменения, повлиявшие на работу ресурса. В таком случае, подождите и вернитесь позже.
- Убедитесь, что антивирус не блокирует работу сайта. Отключите его на некоторое время. Также можно внести адрес ресурса в список исключений.
- Проверьте время и дату, выставленную на компьютере.
- Отключите, или наоборот, включите VPN и прокси. Включение позволит обойти блокировку стороной провайдера.
- Воспользуйтесь сервисом «noblock» для открытия страницы. Если она будет загружена, то очевидно, проблема на вашей стороне.
- Если ERR CACHE MISS появляется на телефоне, подключенном к неизвестной сети, то скорее всего проблема в этой сети. Попробуйте очистить кэш обозревателя и зайти на сайт по адресу «http://».

If you’re a Chrome user, you’ve probably experienced a handful of (rare!) recurring issues. One of these is related to the cache and shows an error message that looks something like “ERR_CACHE_MISS.”
What does this error mean? How do you fix it? Is it difficult to fix?
Luckily, it is very easy to fix this problem yourself.
In this post, we’ll go through nine different possible options to help you find the right Err_Cache_Miss fix for your particular situation – and then get back to browsing.
Let’s get fixing!
Table Of Contents
- What Is the ‘ERR_CACHE_MISS’ in Chrome Error?
- What Causes the ‘ERR_CACHE_MISS’ Error in Chrome?
- How to Fix the ‘ERR_CACHE_MISS’ Error in Chrome
- Solving the ‘ERR_CACHE_MISS’ Error
What Is the ‘ERR_CACHE_MISS’ in Chrome Error?
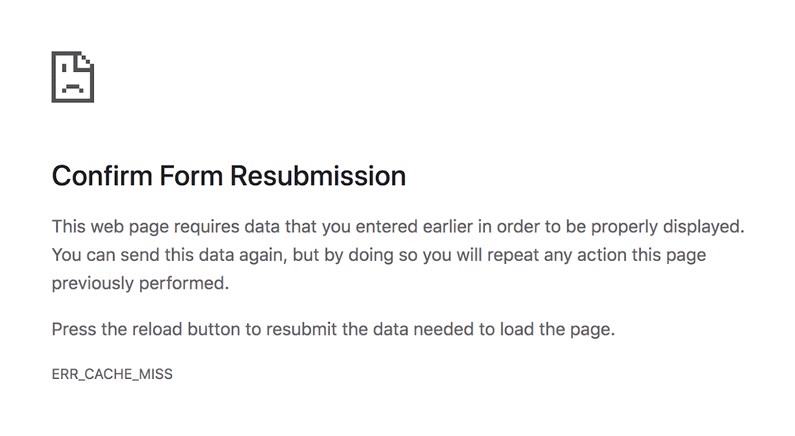
The Err_Cache_Miss message is a common error that appears when loading a web page in the Google Chrome browser.
As the name suggests, it relates to the cache. There are a few different names for it, but they all basically mean the same thing:
- ERR_CACHE_MISS
- CONFIRM FORM RESUBMISSION ERR CACHE MISS
- NET::ERR_CACHE_MISS
- NET ERR_CACHE_MISS
- ERR_CACHE_MISS FIX
Specifically, this error means that there is a mismatch between the live website and the version in your cache. Or, your browser is simply not able to use the cached version of the website you are visiting.
What Is a Browser Cache?
Before we go further, you might wonder: what is a cache, anyway? It’s a word that is commonly used online, but you might not know exactly what it does.
When you navigate to a website, your browser downloads parts of the page to your computer. These include HTML, CSS, JavaScript and images. Basically, these are all “static” elements that don’t usually change on a regular basis.
For example, the layout and design of your site are pretty static and (likely) won’t change more than once a month or two.
The idea is for the browser to save copies of all these files so it can load pages faster the next time you visit. Then, when you do visit, the browser only needs to download any dynamic or updated elements rather than the whole thing.
The result is a faster loading web page, when it works properly anyway!
All of this data, put together, is called the “cache.”
How long is the cache kept on your computer? It depends. In general, it ranges from a few days to a month, but browsers can keep data in your cache for nearly a year.

Hello! My name is Sujay and I’m CEO of Astra.
We’re on a mission to help small businesses grow online with affordable software products and the education you need to succeed.
Leave a comment below if you want to join the conversation, or click here if you would like personal help or to engage with our team privately.
Why Is Caching Helpful?
Caching is helpful because it reduces the amount of data that needs to be downloaded every time you visit a website.
By creating a cache for the static portions of a site, the browser can avoid having to redownload the same content multiple times.
This is especially critical for larger files like images or videos, which you definitely don’t want to be downloading every time you visit the site.
Mobile users in particular benefit from this as users may have limited data plans or slow mobile internet connections.
You can see this happen in real-time yourself. If you visit a new website for the first time, the loading time will be, say 5 seconds.
Close that tab and re-visit the site, however, and the total loading time will probably only be 1 or 2 seconds. This is the browser cache at work.
What Causes the ‘ERR_CACHE_MISS’ Error in Chrome?
The ERR_CACHE_MISS error is usually caused by a problem with the caching system, outdated extensions, or the wrong browser configuration.
Usually, the issue is with your own browser or with a third party extension. As such, updating or resetting your browser or disabling extensions will usually fix the problem.
However, sometimes the error is with the website itself. If it’s not your site, there is unfortunately not much you can do about it, other than contacting the webmaster.
Errors After Submitting a Web Form
If you previously submitted data into a form, Chrome will send a “Confirm Form Submission” notification, which means that you need to submit the data again. This is because the browser’s cache system didn’t work correctly.
This error usually looks like this:
CONFIRM FORM RESUBMISSION ERR CACHE MISS
The problem is the same as the other cache issue, just on a page with a form.
How to Fix the ‘ERR_CACHE_MISS’ Error in Chrome
Now that we know what the ERR_CACHE_MISS problem is, let’s walk through 9 possible solutions.
1. Reload the Page
Before anything else, try reloading (or force reloading) the page. This will often fix the issue by itself.
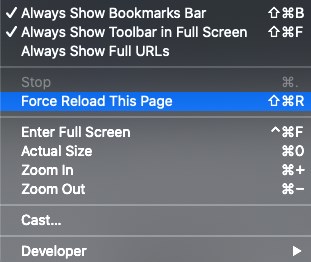
To reload a page in Chrome, simply press CMD+R on a Mac or SHIFT+F5 on PC.
You can also select it via the menu: it’s under View > Reload This Page.
If your page is frozen or otherwise won’t reload correctly, hold Shift to enable Force Reload This Page.
2. Close and Reopen Chrome
If reloading the page doesn’t work, try reloading Chrome itself. Exit the program completely (don’t just close windows) and then re-open it.
Navigate back to the website you’re trying to visit. Does the error still appear?
3. Disable Browser Extensions
Browser extensions are often a problem when it comes to caching. For many unintentional reasons, extensions can interfere with the cache or with the connection between your browser and other websites.
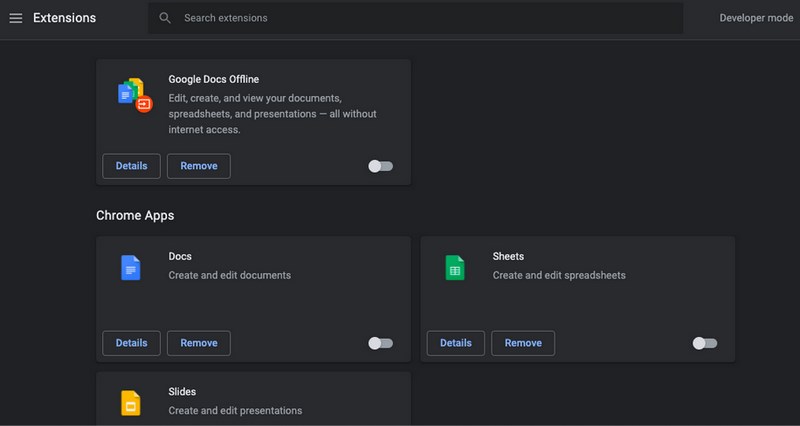
To disable extensions in Chrome, go to More Tools > Extensions in the top menu.
To disable an extension, click the button next to it, in the bottom right corner. It should go from blue to gray.
Once you’ve disabled extensions, try reloading your page. If that doesn’t work, quit and relaunch Chrome itself. Sometimes Chrome needs to be restarted in order to fully disable an extension.
4. Update Chrome
If you’re using an older version of Chrome, it’s likely that this is the source of the issue.
To update Chrome, look in the top right hand corner of your browser window. There, you should see a large Update button.

Click on that button, then relaunch Chrome to apply the update. Once it’s done updating, navigate back to your page and see if you still get the net err_cache_miss error.
5. Clear Cache and Other Browsing Data
Clearing your cache is a quick way to reset everything and potentially fix any issues with the cache.
Mac
To do this in Chrome, go to the Chrome menu item and click the third item down, Clear Browsing Data.

Then, when the page loads, you’ll see the full options panel. Make sure the Cached images and files box is selected and then press Clear data.
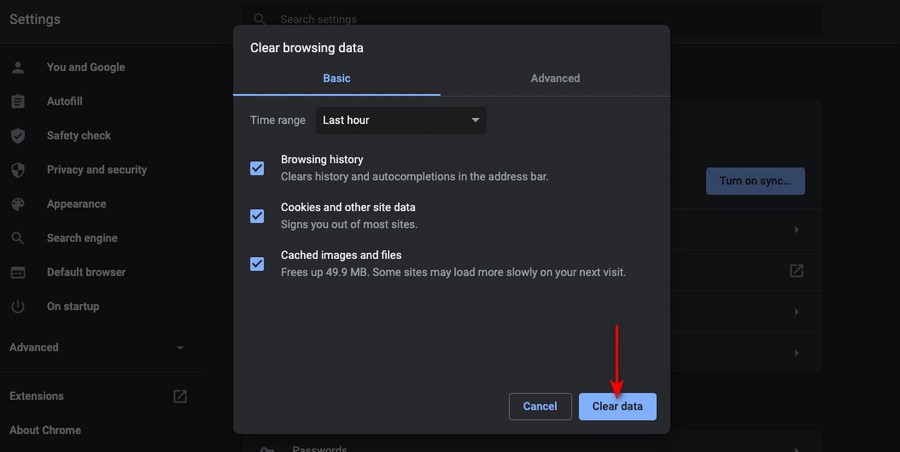
Now visit the website. Is the ERR_CACHE_MISS error still appearing?
Windows
The process in Windows is essentially the same. However, to access the settings panel, you’ll need to click the three dots in the top right corner of the screen.
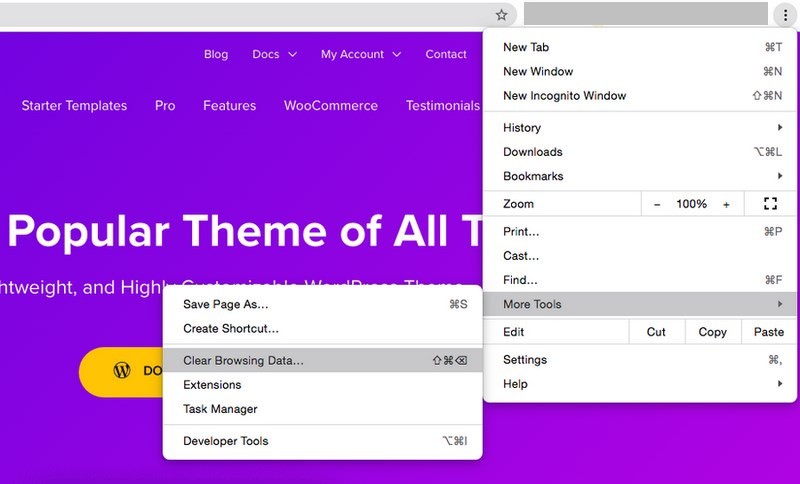
Then, click More Tools and Clear Browsing Data. Make sure that the Cached images and files option is selected.
6. Reset Google Chrome Settings
If resetting the cache didn’t work, you can also try resetting Chrome entirely.
To do this, go to Chrome > Preferences.
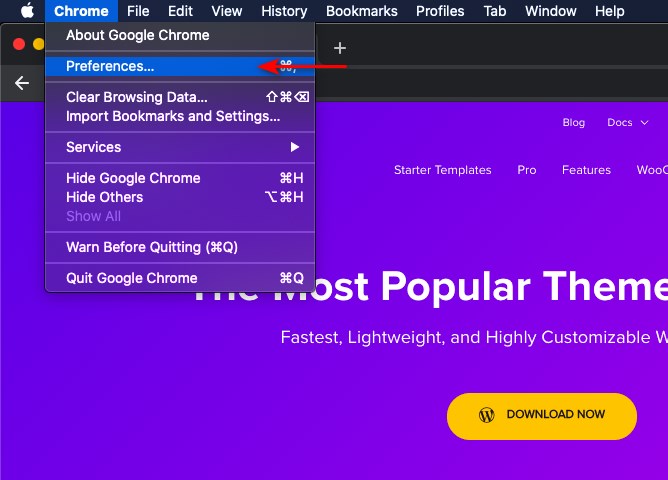
Then, search for “reset settings”. One option will appear: Restore settings to their original defaults. Click on that item.
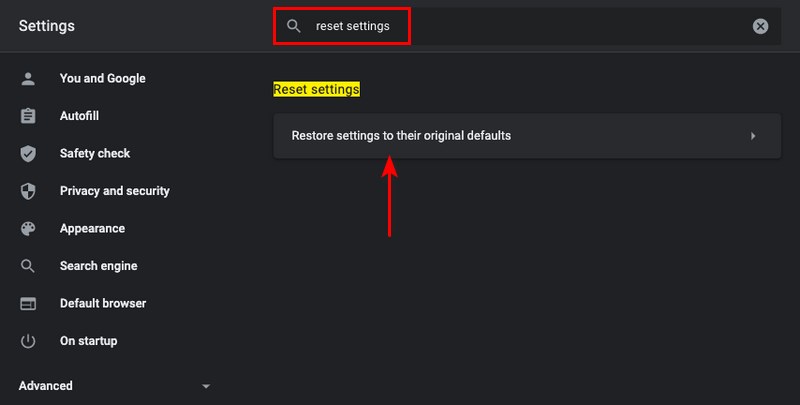
You’ll now see the reset settings panel. Press the blue button to reset everything.
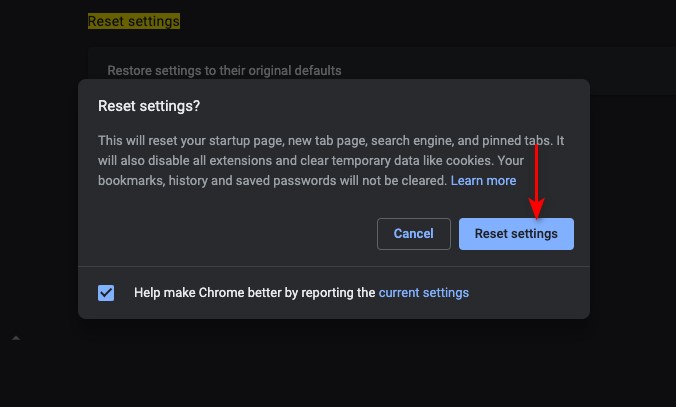
Windows
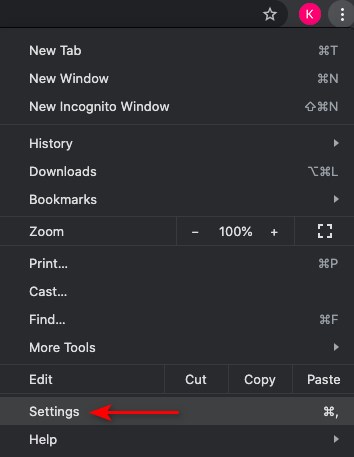
Click on the three dots in the top right corner of the screen. Then, click Settings.
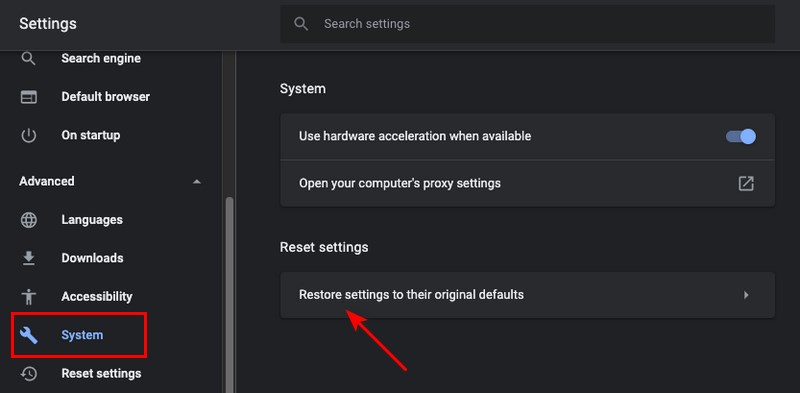
Now click on the Advanced tab on the left hand side. Click Restore all settings to their original defaults to reset Chrome.
7. Delete and Reinstall Chrome
If resetting the Chrome settings didn’t work, try deleting and resetting Chrome itself. The exact uninstallation process will depend on what operating system you’re using.
- Windows 10
Close all Chrome tabs and windows. Click the Start menu and Settings. Next, click Apps. Under “Apps & features,” look for Google Chrome and click Uninstall. Press the confirmation message. Finally, go to Google.com/Chrome to redownload the app. Open it and reinstall the browser.
- Windows 8
Close all Chrome tabs and windows. Point to the top right of your screen, then click Settings > Control Panel. Find “Uninstall a Program” and double click on Google Chrome. Confirm the uninstallation and finally, redownload the program at Google.com/Chrome. Open the downloaded file and reinstall Chrome.
- Windows 7
Close all Chrome tabs and windows. Click the Start menu and then Control Panel. Find “Uninstall a Program” and double click on Google Chrome. Confirm the uninstallation and finally, redownload the program at Google.com/Chrome. Open the download package and reinstall the web browser.
- Windows Vista
See instructions for Windows 7 above.
- Windows XP
Close all Chrome tabs and windows. Open the Start menu and click Control Panel. Next, click Add or Remove Programs and find Google Chrome. Click Remove and then Uninstall to confirm. Finally, redownload the program at Google.com/Chrome and reinstall it.
- Mac
Close the Chrome app. Go to the Applications folder and find Chrome. Drag it to the trash. Finally, redownload Chrome at Google.com/Chrome and reinstall it.
- Android
First, open your mobile device’s Settings app. Then, touch Apps & Notifications, and then Chrome. If it isn’t visible, click See all apps. Next, click Disable. Finally, reinstall the app from the Play Store.
- iPhone and iPad
On your device, touch and hold the Chrome app. Tap the Remove X in the top corner. Confirm the delete action. Finally, go to the App Store and redownload Chrome.
Read more about deleting Chrome.
8. Disable the Browser Cache
Finally, as a last step, you can also disable the cache system entirely. To do this, you’ll need to use Chrome’s Inspect feature.
Open the page you want to connect to. Right click on the page and select Inspect.

Now you will see the Inspect panel. Click on the Network tab (the fourth item from the left) and then check the Disable cache box immediately below it.

Reload the page. Is the issue gone?
9. Reset Your Network Settings
Still having issues? The issue might be with your network itself.
Reset your network and network settings. If possible, try to connect from a different network, too. This will let you know if the problem is local to your computer, local to your network, or a problem with something else entirely.
Mac OSX
To reset your network settings in Mac OSX, click on the Apple icon in the top left and then click on System Preferences. Find the Network icon and click it.
Then, select your current network and press the minus button to remove it. Reconnect by adding in the login/password.
Windows
To reset your network settings in Windows, open the Start menu and go to Settings > Network and Internet > Status. Then, click Network Reset.
Solving the ‘ERR_CACHE_MISS’ Error
While the The Err_Cache_Miss error is a frustrating one, it’s easily solvable if you just try the different solutions in this post.
In the end, it’s a common error and one that doesn’t require too many technical skills to fix.
In this post, we covered nine different ways to solve the ERR_CACHE_MISS error. As the name suggests, this error is caused by a problem with the cache system. By resetting or fixing the cache, the error should go away!
Have you experienced this error while using Chrome? What solution worked for you? Did we forget anything in our list of nine solutions above? Share it with your audience in the comments!
Google Chrome is one of the most popular and reliable web browsers out there, but it isn’t without fault. There are a handful of common issues you might encounter while using it, including the ‘ERR_CACHE_MISS’ error message.
If you’ve come across this message, chances are the browser is also asking you to re-enter or submit some information. While this error can be confusing and frustrating, it’s also entirely fixable.
There are a handful of quick, easy methods you can use to resolve this error message, and successfully reach the site you’re trying to visit.
In this post, we’ll explain what ‘ERR_CACHE_MISS’ means and discuss some of its common causes. Then we’ll walk you through several methods you can use to fix it.
Let’s get started!
What Does ‘ERR_CACHE_MISS’ Mean?
There are a handful of popular error messages you might come across when using Chrome. These include issues like ERR_QUIC_PROTOCOL_ERROR and ERR_SSL_OBSOLETE_VERSION.
Another error that Chrome users frequently encounter is the ‘ERR_CACHE_MISS’ message:
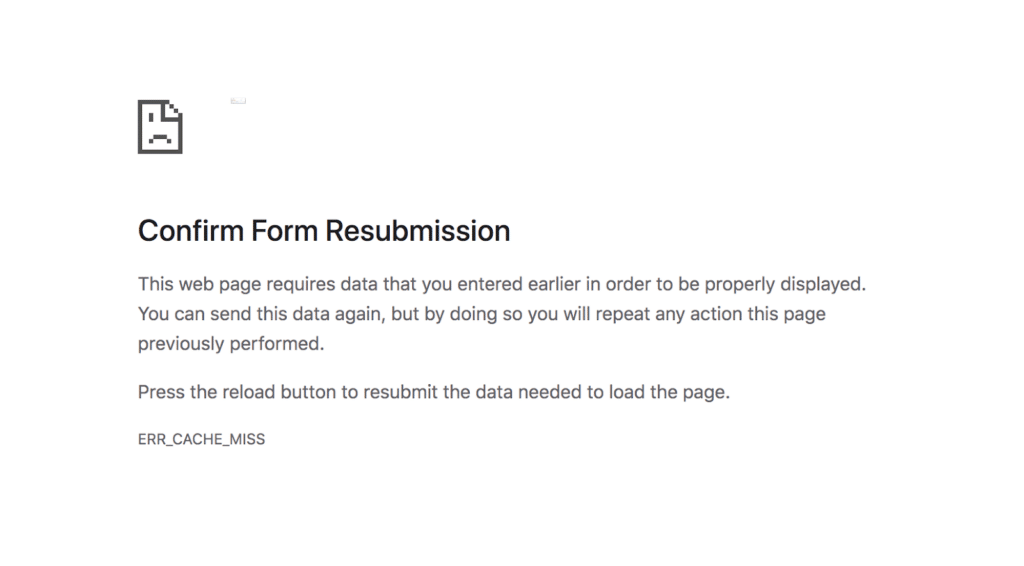
From the name, it’s clear that this error is related to caching. More specifically, there are a variety of reasons you might be seeing this message, including:
- Your browser is unable to obtain cache files from the site you’re trying to access.
- There are bugs, corruptions, or inefficiencies in your browser, browser settings, or browser extensions.
- The website you’re trying to visit has incorrect coding or PHP issues.
If you’re a developer, you may encounter this message if you’re using the wrong codes to test an application or website, either on Android or another OS.
As a user, you could encounter it when trying to access just about any website, even highly-popular ones such as Facebook.
It’s worth noting that while this problem is almost entirely exclusive to Chrome, some users have reported running into similar issues in Firefox. More specifically, in versions of Firefox 32 and above, the message reads as “Document Expired”.
However, most messages include a “Confirm Form Resubmission” message or prompt. This usually occurs when a Chrome user is completing or submitting a form and uses the back/forward buttons too often or too quickly.
The ‘ERR_CACHE_MISS’ error: Confusing. Frustrating. But fixable! ✅ Read more here ⬇️Click to Tweet
How to Fix ‘ERR_CACHE_MISS’ in Google Chrome (7 Solutions)
Now that you understand a bit more about what ‘ERR_CACHE_MISS’ means, it’s time to learn how to resolve it. Let’s take a look at seven methods you can use to fix the ‘ERR_CACHE_MISS’ message in Google Chrome.
1. Reload the Page
Occasionally, the ‘ERR_CACHE_MISS’ error in Chrome may appear on your screen if you’re experiencing network connection issues. If this is the case, simply reloading the web page might be enough to resolve it.
You can reload the page by clicking on the reload icon in the top-left corner of the address bar in your Chrome browser:

Alternatively, you can also press the F5 key on your keyboard. If you still see the error message, it’s safe to assume that your network connectivity was not the source of the issue, and it’s time to move on to the next method.
2. Update Your Browser
If you’re using an old or outdated version of Chrome, it’s a smart idea to upgrade to the latest version. This can help to eliminate any incompatibility issues or inefficiencies that might be contributing to the ‘ERR_CACHE_MISS’ error message.
To update your browser, open a new window and then navigate to Settings > About Chrome:
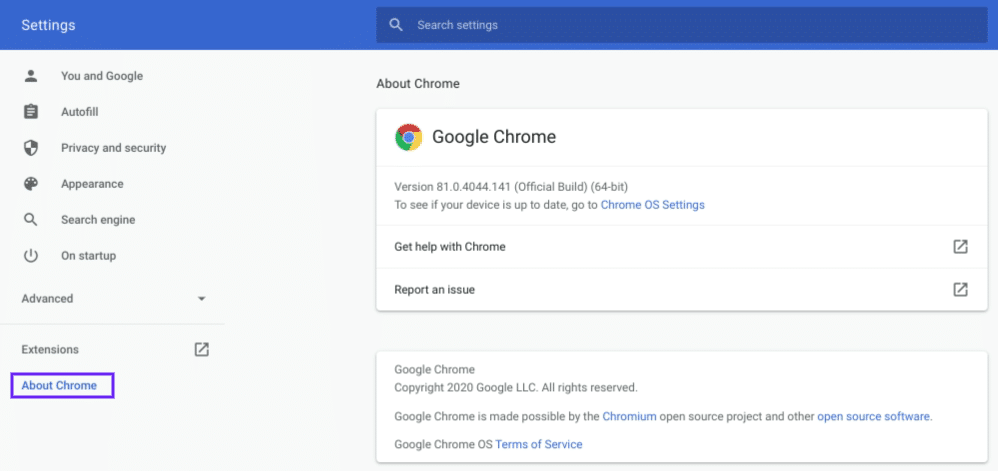
On this page, you’ll see whether you’re using the latest version of the browser. If you’re not, there will be an option to Update Chrome.
Follow the prompts, then restart your browser and try to access the web page again.
3. Clear Your Browser Data
If your browser has accumulated corrupted files in your cache, it may result in the error message you’re seeing now. Therefore, the next step you should take in your attempt to resolve the problem is to clear your browser data.
To do this, go back to your Chrome settings menu. Hover over More tools, and then in the menu panel that opens, select Clear browsing data:
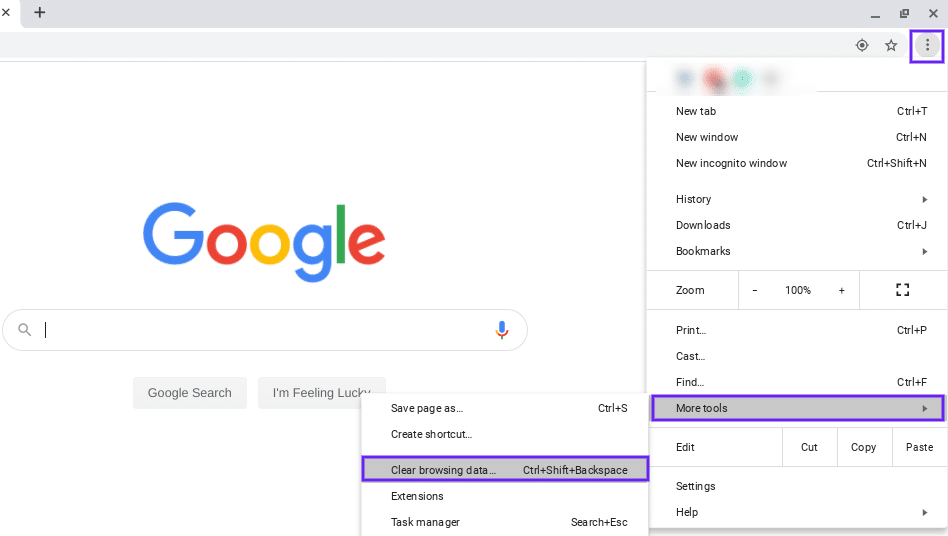
In the window that appears next, make sure all three options (Browsing history, Cookies and other site data, and Cached images and files) are selected. Hit the Clear data button:
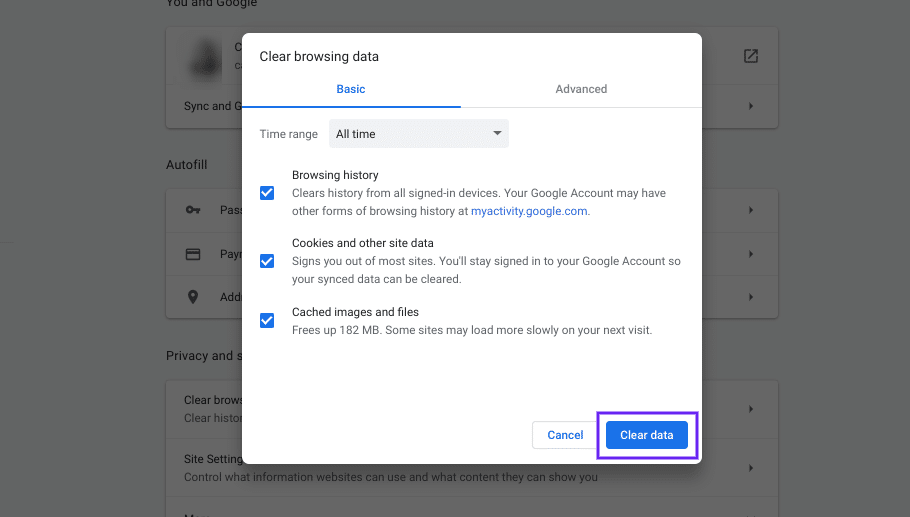
Once you clear the data, refresh the browser.
Hopefully, you’ll no longer see the ERR_CACHE_MISS message. If you do, it’s time for the next method.
Check Out Our Video Guide to Clearing Cache
4. Disable Your Browser Extensions
Another potential issue that may be causing the ‘ERR_CACHE_MISS’ error is that one of the extensions you have installed is corrupted, or is interfering with Chrome’s ability to connect to and load the web page.
To determine whether this is the problem, the best course of action is to disable all of your browser extensions.
To locate these, go to your Chrome settings, hover over the More tools option, and then select Extensions:
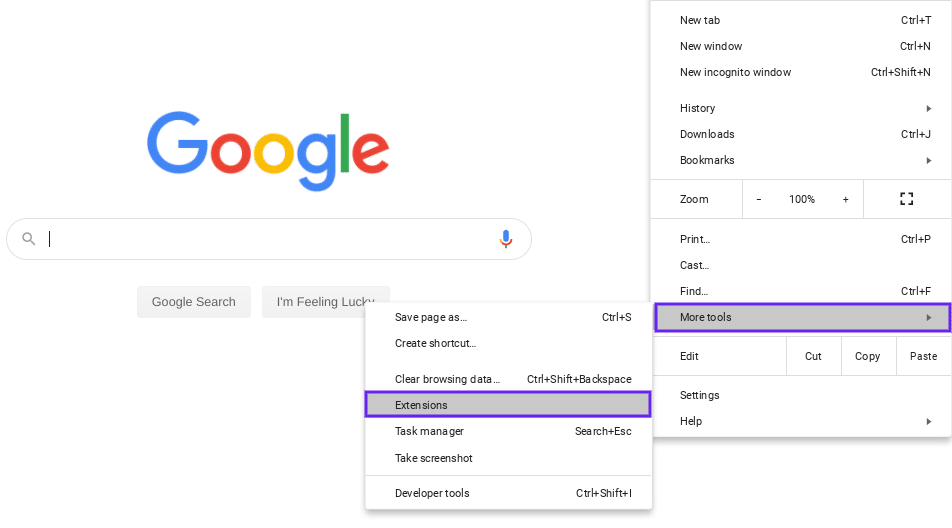
This will bring you to the Extensions page, where you can see any and all extensions that are installed. One by one, go through them and toggle the disable option for each:
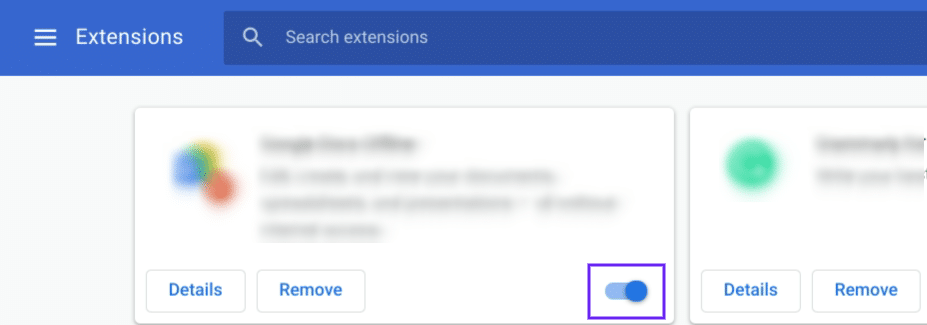
We recommend starting with any ad blocking extensions, as these are most likely to be the culprit. Try refreshing your browser after you disable each extension, to see if the error resolves itself.
If it does, you’ll be able to pinpoint (and remove) the problematic extension. If not, your extensions probably aren’t to blame.
5. Reset Your Network Settings
Problems with your network settings can also cause the ‘ERR_CACHE_MISS’ message. To resolve that, you can try resetting those settings.
The easiest way to do this is through your Command Window, which you can open by clicking on the Windows icon, typing “cmd” into the search field, and then selecting Run as Administrator in the Command Prompt app:
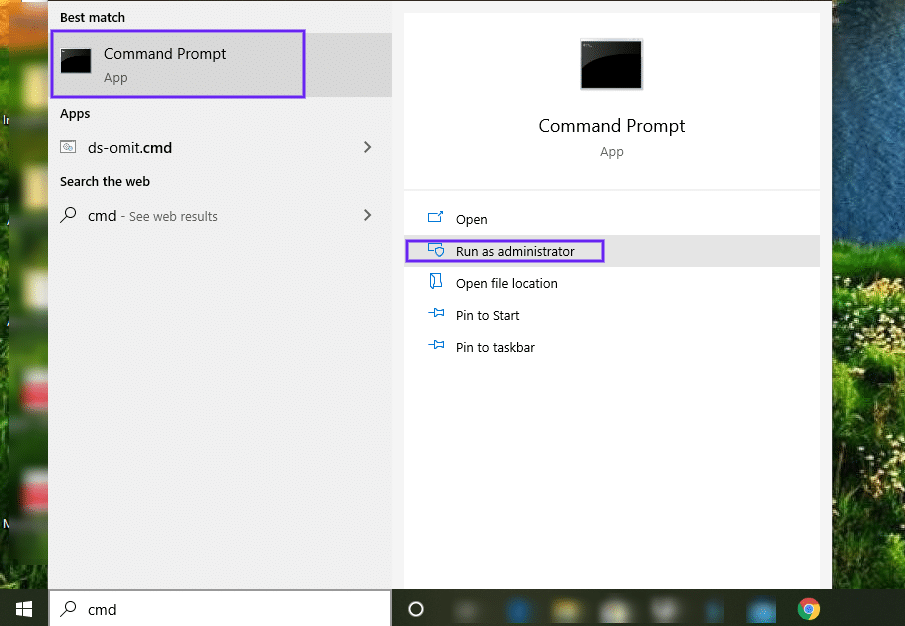
With the Command Prompt window open, type in the following and press Enter after each line:
ipconfig/release

ipconfig/all

ipconfig/flushdns

ipconfig/renew

netsh int ip set dns

netsh winsock reset

ipconfig renew

ipconfig renew
On macOS, you can do this through the Terminal app. Navigate to Finder > Applications > Utilities:
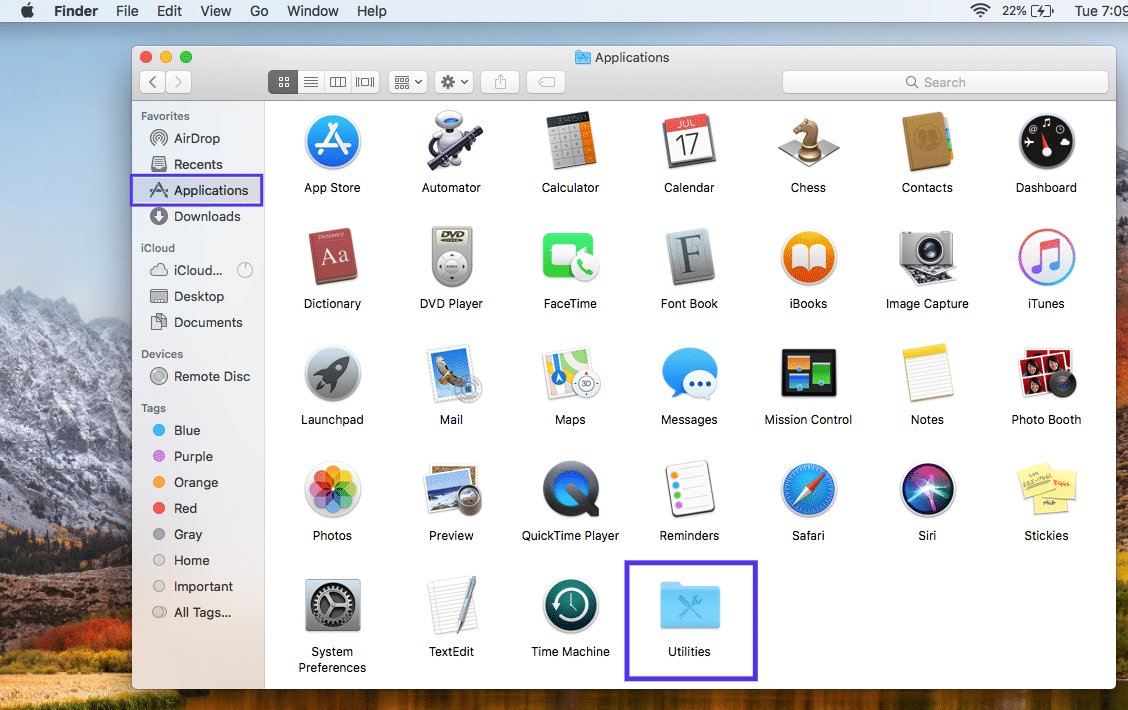
Once you open the Utilities folder, locate and open the Terminal app:
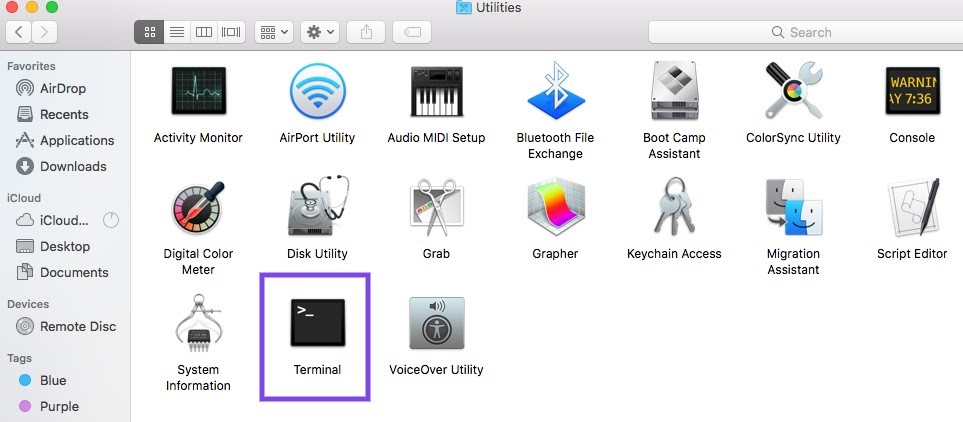
In the Terminal window, type in the following commands and press Enter after each one:
dscacheutil -flushcache

sudo killall -HUP mDNSResponder
Restart your computer and open a new browser window. Your network settings will revert to their defaults, which will hopefully keep you from seeing the ‘ERR_CACHE_MISS’ error again.
6. Reset Your Browser Settings
If your network settings aren’t the issue, the problem may lie with your browser settings. Therefore, the next logical step is to reset those settings.
To do this, go to Settings, followed by Advanced > Reset settings:
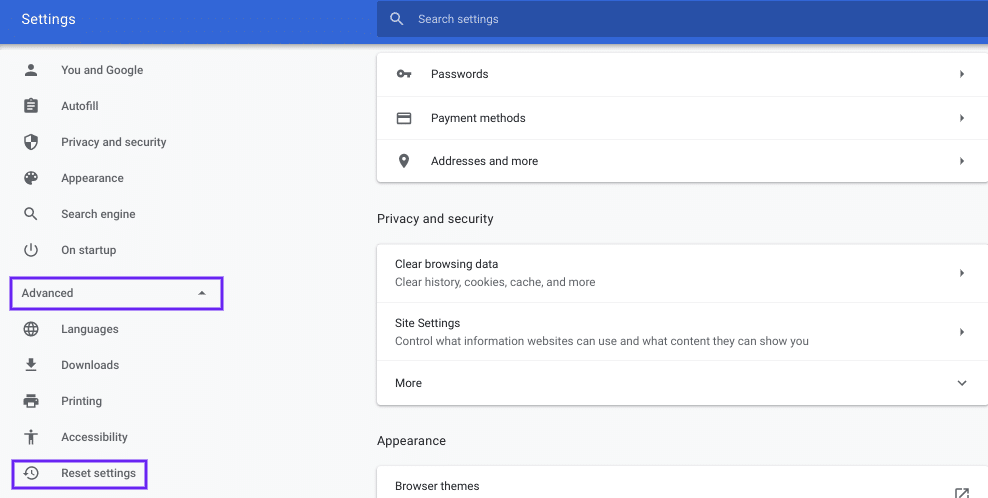
A prompt window will open. Again, click on the Reset option:
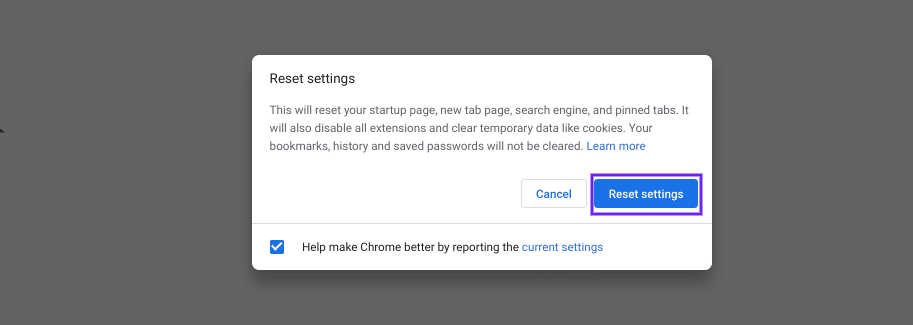
You can also access the reset settings page by going to chrome://settings/resetProfileSettings.
Finally, restart your browser and try to access the web page again. Hopefully, you will no longer see the ’ERR_CACHE_MISS’ message. However, if you do, it’s time to move on to the last method.
7. Disable Your Cache System
At this point, you have hopefully resolved the ‘ERR_CACHE_MISS’ error message in Chrome. If not, there’s one last solution you can try to fix the problem: disabling your caching system.
Doing this requires you to use the Chrome DevTools. These can be found in the browser’s settings, under More tools > Developer tools. Just be sure to open the DevTools on the browser page that’s displaying the error message.
Then, under the Network section, select the option to Disable Cache:

Once you check this item, reload the web page. You should no longer see the ‘ERR_CACHE_MISS’ message.
If you use Google Chrome, you may be familiar with the ‘ERR_CACHE_MISS’ error. 😤 Learn how to fix it and get back to work right here. 🚀Click to Tweet
Summary
There are a variety of reasons you might see the ‘ERR_CACHE_MISS’ error message in Google Chrome. Whether it’s due to problematic extensions, outdated browser or network settings, or a temporary connection issue, the good news is that there are some simple steps you can take to fix this problem.
As we discussed in this article, there are seven methods you can use to resolve the ‘ERR_CACHE_MISS’ error in Chrome:
- Reload the page.
- Update your browser.
- Clear your browser data.
- Disable your browser extensions.
- Reset your network settings.
- Reset your browser settings.
- Disable your cache system.
Happy fixing!
Get all your applications, databases and WordPress sites online and under one roof. Our feature-packed, high-performance cloud platform includes:
- Easy setup and management in the MyKinsta dashboard
- 24/7 expert support
- The best Google Cloud Platform hardware and network, powered by Kubernetes for maximum scalability
- An enterprise-level Cloudflare integration for speed and security
- Global audience reach with up to 35 data centers and 275+ PoPs worldwide
Test it yourself with $20 off your first month of Application Hosting or Database Hosting. Explore our plans or talk to sales to find your best fit.
Google Chrome is one of the most popular and reliable web browsers out there, but it isn’t without fault. There are a handful of common issues you might encounter while using it, including the ‘ERR_CACHE_MISS’ error message.
If you’ve come across this message, chances are the browser is also asking you to re-enter or submit some information. While this error can be confusing and frustrating, it’s also entirely fixable.
There are a handful of quick, easy methods you can use to resolve this error message, and successfully reach the site you’re trying to visit.
In this post, we’ll explain what ‘ERR_CACHE_MISS’ means and discuss some of its common causes. Then we’ll walk you through several methods you can use to fix it.
Let’s get started!
What Does ‘ERR_CACHE_MISS’ Mean?
There are a handful of popular error messages you might come across when using Chrome. These include issues like ERR_QUIC_PROTOCOL_ERROR and ERR_SSL_OBSOLETE_VERSION.
Another error that Chrome users frequently encounter is the ‘ERR_CACHE_MISS’ message:

From the name, it’s clear that this error is related to caching. More specifically, there are a variety of reasons you might be seeing this message, including:
- Your browser is unable to obtain cache files from the site you’re trying to access.
- There are bugs, corruptions, or inefficiencies in your browser, browser settings, or browser extensions.
- The website you’re trying to visit has incorrect coding or PHP issues.
If you’re a developer, you may encounter this message if you’re using the wrong codes to test an application or website, either on Android or another OS.
As a user, you could encounter it when trying to access just about any website, even highly-popular ones such as Facebook.
It’s worth noting that while this problem is almost entirely exclusive to Chrome, some users have reported running into similar issues in Firefox. More specifically, in versions of Firefox 32 and above, the message reads as “Document Expired”.
However, most messages include a “Confirm Form Resubmission” message or prompt. This usually occurs when a Chrome user is completing or submitting a form and uses the back/forward buttons too often or too quickly.
The ‘ERR_CACHE_MISS’ error: Confusing. Frustrating. But fixable! ✅ Read more here ⬇️Click to Tweet
How to Fix ‘ERR_CACHE_MISS’ in Google Chrome (7 Solutions)
Now that you understand a bit more about what ‘ERR_CACHE_MISS’ means, it’s time to learn how to resolve it. Let’s take a look at seven methods you can use to fix the ‘ERR_CACHE_MISS’ message in Google Chrome.
1. Reload the Page
Occasionally, the ‘ERR_CACHE_MISS’ error in Chrome may appear on your screen if you’re experiencing network connection issues. If this is the case, simply reloading the web page might be enough to resolve it.
You can reload the page by clicking on the reload icon in the top-left corner of the address bar in your Chrome browser:

Alternatively, you can also press the F5 key on your keyboard. If you still see the error message, it’s safe to assume that your network connectivity was not the source of the issue, and it’s time to move on to the next method.
2. Update Your Browser
If you’re using an old or outdated version of Chrome, it’s a smart idea to upgrade to the latest version. This can help to eliminate any incompatibility issues or inefficiencies that might be contributing to the ‘ERR_CACHE_MISS’ error message.
To update your browser, open a new window and then navigate to Settings > About Chrome:

On this page, you’ll see whether you’re using the latest version of the browser. If you’re not, there will be an option to Update Chrome.
Follow the prompts, then restart your browser and try to access the web page again.
3. Clear Your Browser Data
If your browser has accumulated corrupted files in your cache, it may result in the error message you’re seeing now. Therefore, the next step you should take in your attempt to resolve the problem is to clear your browser data.
To do this, go back to your Chrome settings menu. Hover over More tools, and then in the menu panel that opens, select Clear browsing data:

In the window that appears next, make sure all three options (Browsing history, Cookies and other site data, and Cached images and files) are selected. Hit the Clear data button:

Once you clear the data, refresh the browser.
Hopefully, you’ll no longer see the ERR_CACHE_MISS message. If you do, it’s time for the next method.
Check Out Our Video Guide to Clearing Cache
4. Disable Your Browser Extensions
Another potential issue that may be causing the ‘ERR_CACHE_MISS’ error is that one of the extensions you have installed is corrupted, or is interfering with Chrome’s ability to connect to and load the web page.
To determine whether this is the problem, the best course of action is to disable all of your browser extensions.
To locate these, go to your Chrome settings, hover over the More tools option, and then select Extensions:

This will bring you to the Extensions page, where you can see any and all extensions that are installed. One by one, go through them and toggle the disable option for each:

We recommend starting with any ad blocking extensions, as these are most likely to be the culprit. Try refreshing your browser after you disable each extension, to see if the error resolves itself.
If it does, you’ll be able to pinpoint (and remove) the problematic extension. If not, your extensions probably aren’t to blame.
5. Reset Your Network Settings
Problems with your network settings can also cause the ‘ERR_CACHE_MISS’ message. To resolve that, you can try resetting those settings.
The easiest way to do this is through your Command Window, which you can open by clicking on the Windows icon, typing “cmd” into the search field, and then selecting Run as Administrator in the Command Prompt app:

With the Command Prompt window open, type in the following and press Enter after each line:
ipconfig/release

ipconfig/all

ipconfig/flushdns

ipconfig/renew

netsh int ip set dns

netsh winsock reset

ipconfig renew

ipconfig renew
On macOS, you can do this through the Terminal app. Navigate to Finder > Applications > Utilities:

Once you open the Utilities folder, locate and open the Terminal app:

In the Terminal window, type in the following commands and press Enter after each one:
dscacheutil -flushcache

sudo killall -HUP mDNSResponder
Restart your computer and open a new browser window. Your network settings will revert to their defaults, which will hopefully keep you from seeing the ‘ERR_CACHE_MISS’ error again.
6. Reset Your Browser Settings
If your network settings aren’t the issue, the problem may lie with your browser settings. Therefore, the next logical step is to reset those settings.
To do this, go to Settings, followed by Advanced > Reset settings:

A prompt window will open. Again, click on the Reset option:

You can also access the reset settings page by going to chrome://settings/resetProfileSettings.
Finally, restart your browser and try to access the web page again. Hopefully, you will no longer see the ’ERR_CACHE_MISS’ message. However, if you do, it’s time to move on to the last method.
7. Disable Your Cache System
At this point, you have hopefully resolved the ‘ERR_CACHE_MISS’ error message in Chrome. If not, there’s one last solution you can try to fix the problem: disabling your caching system.
Doing this requires you to use the Chrome DevTools. These can be found in the browser’s settings, under More tools > Developer tools. Just be sure to open the DevTools on the browser page that’s displaying the error message.
Then, under the Network section, select the option to Disable Cache:

Once you check this item, reload the web page. You should no longer see the ‘ERR_CACHE_MISS’ message.
If you use Google Chrome, you may be familiar with the ‘ERR_CACHE_MISS’ error. 😤 Learn how to fix it and get back to work right here. 🚀Click to Tweet
Summary
There are a variety of reasons you might see the ‘ERR_CACHE_MISS’ error message in Google Chrome. Whether it’s due to problematic extensions, outdated browser or network settings, or a temporary connection issue, the good news is that there are some simple steps you can take to fix this problem.
As we discussed in this article, there are seven methods you can use to resolve the ‘ERR_CACHE_MISS’ error in Chrome:
- Reload the page.
- Update your browser.
- Clear your browser data.
- Disable your browser extensions.
- Reset your network settings.
- Reset your browser settings.
- Disable your cache system.
Happy fixing!
Get all your applications, databases and WordPress sites online and under one roof. Our feature-packed, high-performance cloud platform includes:
- Easy setup and management in the MyKinsta dashboard
- 24/7 expert support
- The best Google Cloud Platform hardware and network, powered by Kubernetes for maximum scalability
- An enterprise-level Cloudflare integration for speed and security
- Global audience reach with up to 35 data centers and 275+ PoPs worldwide
Test it yourself with $20 off your first month of Application Hosting or Database Hosting. Explore our plans or talk to sales to find your best fit.
The err_cache_miss Error is one of the most common errors messages you will find in Google Chrome. I know it is quite a frustrating and irritating situation when you find such type of error messages on your Web browser. But these error messages also let you know what is going wrong with your browser or some additional information you have missed submitting.
Similarly, whenever you come across such an error message on your chrome browser, it means the browser is asking you to provide or enter some additional information. Apart from all these, there are some quick and effective methods are available through which it can be easy for you to resolve this issue easily and will be able to access your website without any hindrance.
Considering “err_cache_miss” error message “err_cache_miss on your chrome browser, we will try to cover all the aspects of this such as, what is the meaning of “Err_Cache_miss” mean? What are the reasons that trigger this issue? and how you can fix this, more comprehensively.
Then what are we waiting for, let us get started!
What is err_cache_miss meaning?
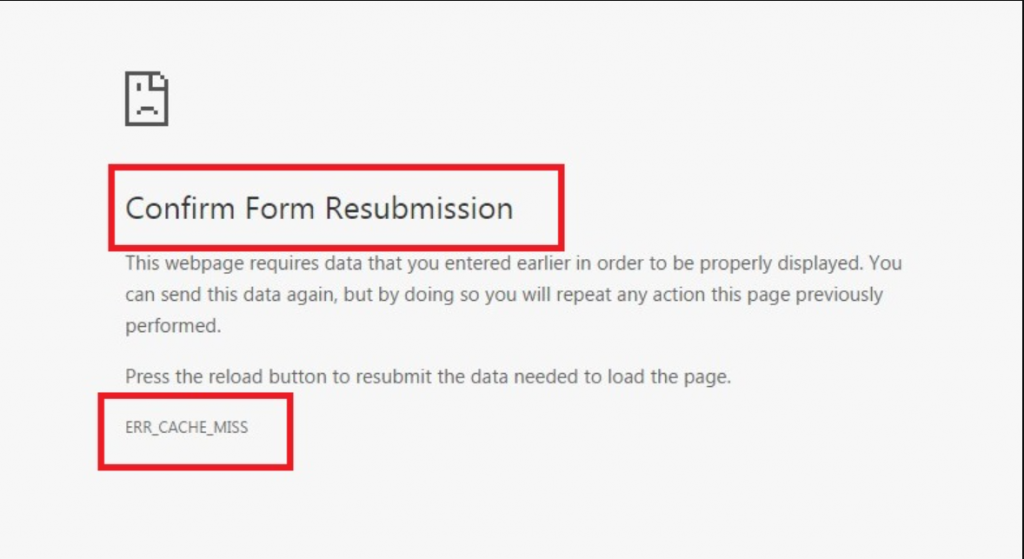
The err_cache_miss meaning is the website which you are trying to visit, requires a particular data submission to proceed further. But when this particular data submission fails, it triggers an error called err_cache_miss on your browser.
However, there are plenty of other common error messages you might have come across while using chrome such as DNS server not responding and Error 404 not being found. Similarly, err_cache_miss is also the most common error you will find in chrome.
And from the name itself, these types of errors let you know what went wrong or what causes the problem. In the err_cache_miss error, you can see the “err_cache_miss” error is generated due to some caching issue.
In addition to it, there are plenty of other reasons for generating the “err_cache_miss” error on your Chrome browser are:
- When your browser is not getting cache files from the website you’re trying to open on your browser.
- It is also possible that the web developer has not correctly coded the website or its PHP file has been damaged.
- There can be some serious issues with your web browsers such as bugs present in browser extensions and improper browser settings.
However, you can face “err_miss_cache” on many different occasions such as if you are running tests on the website or any application with the wrong codes on any platform. One another thing to be worth noticing is that the “err_cache_miss” error message is not limited to only ordinary websites. You can encounter this type of error with any website available on the internet even Facebook.
Also, it has been found that this err_cache_miss error is no longer exclusive to chrome only. It has been also found that similar issues were detected in a Firefox web browser but with different error messages “Document Expired” or ” Confirm form resubmission ERR_CACHE_MISS “.
Sometimes, the triggering of err_cache_miss error cannot be due to improper browser settings or poor website coding by developers. The hackers and cybercriminals also keep on inventing new and different tactics to infect your web browser and make it unfit for use.
Hence, it is highly advisable that, whenever you face such an issue, you must scan your PC entirely with a good antivirus program immediately. However, there are also various repair tools available from which you choose.
Now, see what methods you can follow to fix/resolve this err_cache_miss error. We will start with the easiest ones and end up with the most lengthy and technical ones.
1. Refresh/Reload the Webpage
The easiest and most common method that everyone can try is to Refresh or reload the webpage. Sometimes this error can occur due to poor internet connectivity issues. For example, when you are trying to access the website, during webpage loading, your internet connection might get disconnected for a few seconds that you might not even notice.
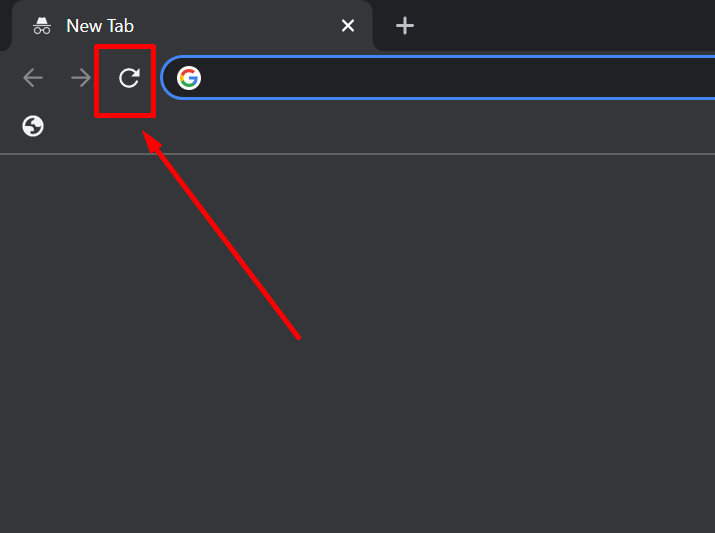
You can reload/refresh the webpage by either pressing the F5 key on your keyboard or clicking on the “Reload this page” icon located just beside your chrome browser address bar. However, if this doesn’t help you, there are other efficient methods provided below.
2. Update your Browser with the latest version available
Sometimes outdated versions of your web browsers can trigger various types of errors. Which can only be fixed by updating them with their latest version available. Similarly, err_cache_miss is a Chrome browser-centric issue that can be resolved if you update your Chrome browser with the latest version.
To begin with the updating Google Chrome Browser, you need to go to your Chrome browser Settings followed by About Chrome:
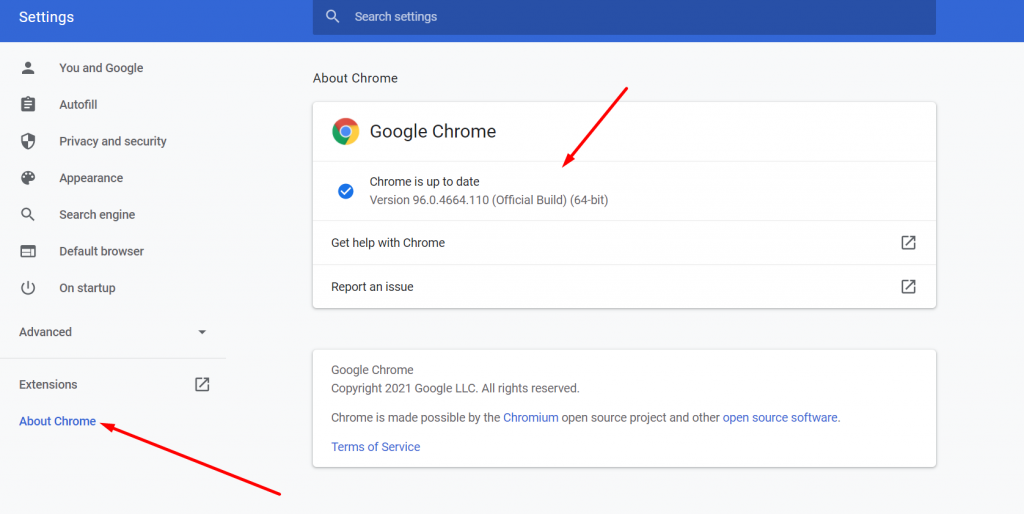
When you click on About Chrome as shown in the picture above, Chrome will start looking for updates automatically. And if there is an update available it will ask you to update immediately. After updating successfully, you need to hit the relaunch button to finish the process.
Now if the outdated version of Chrome is the main culprit for triggering the err_cache_miss error. It should get resolved immediately. Just try to access the website you want and if there is no issue, it means it is done right, if not then you need to move on to another solution.
3. Purge your Browsing History or Data
IT is also possible that the err_cache_miss can be occurred due to corrupt files that have been stored by your Chrome Browser in Cache memory. And this can be easily resolved by simply clearing or purging out your Browsing History or Data completely.
To do so, you need to go to your google chrome browser Customize and Control Google chrome option, which you will find at the top right corner of the browser represented by three horizontal dots.

And follow this, Customize and Control Google Chrome > History> Clear Browsing Data.
Select Time range as All time and tick mark the related field as shown in the picture below Finally click on the Clear data button to complete the process.
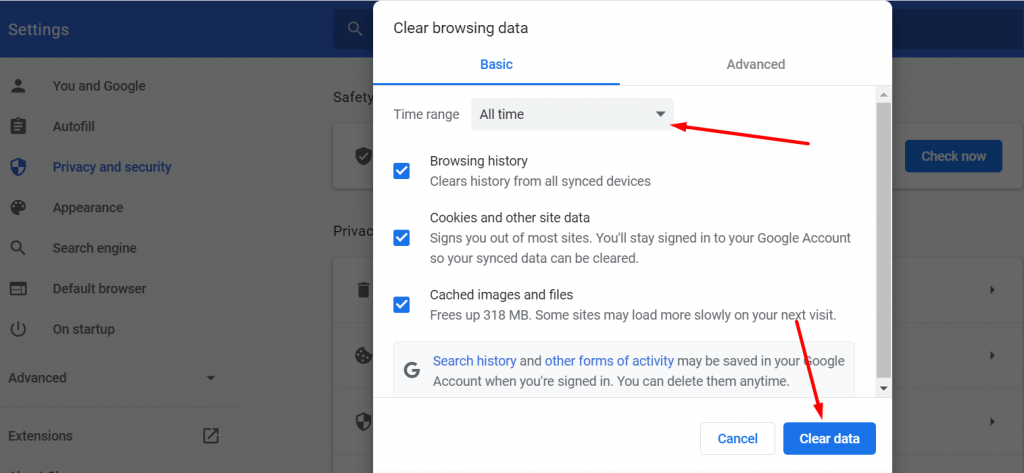
Now check if this method can fix the error, if yes that means the corrupt cache files were the main culprit for triggering the err_cache_miss error. If not, then you must continue with the next method mentioned below:
4. Disable your Chrome browser Extensions
There is also the possibility that a corrupted or infected extension that you have installed on your Chrome browser is triggering this cache error. So, the best solution for this type of issue can be better resolved by simply disabling all the installed extensions and seeing if the issue is still there or not.
To begin with the process, you need to open your chrome browser and click on the extension icon located at the top right corner of the browser as shown in the picture below, and choose to manage extensions options shown.
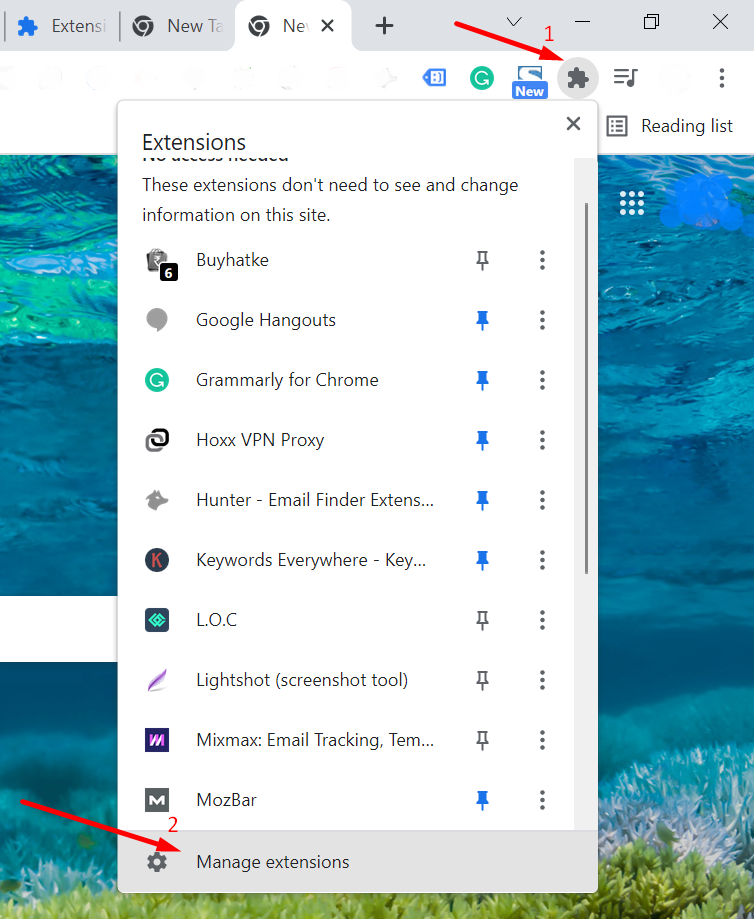
Now you will be able to see all the Extensions installed on your browser on a single page. Move over to the extension you want to disable and click on the toggle to disable it.
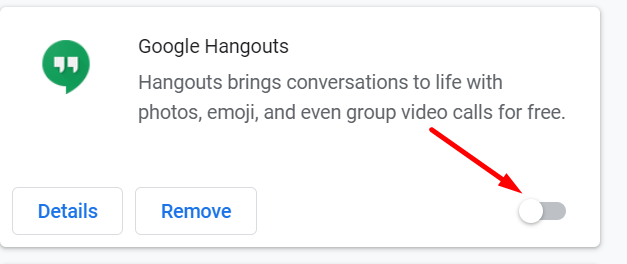
Now to check which extension is the main culprit, you need to disable the one-by-one extension and refresh your browser, and check if the error is fixed. If it can fix the issue, it means extensions were causing the issue if not move on to the next method.
5. Change or Refresh your Network Settings
Another possible culprit for this error could be an issue with your Current Network Settings. So, you must also try to refresh or change your Network Settings as soon as possible with the help of CMD.
To begin with the process, the first thing you need to do is to type “CMD” in your windows search field and right-click to select “Run as Administrator” as shown in the picture below:
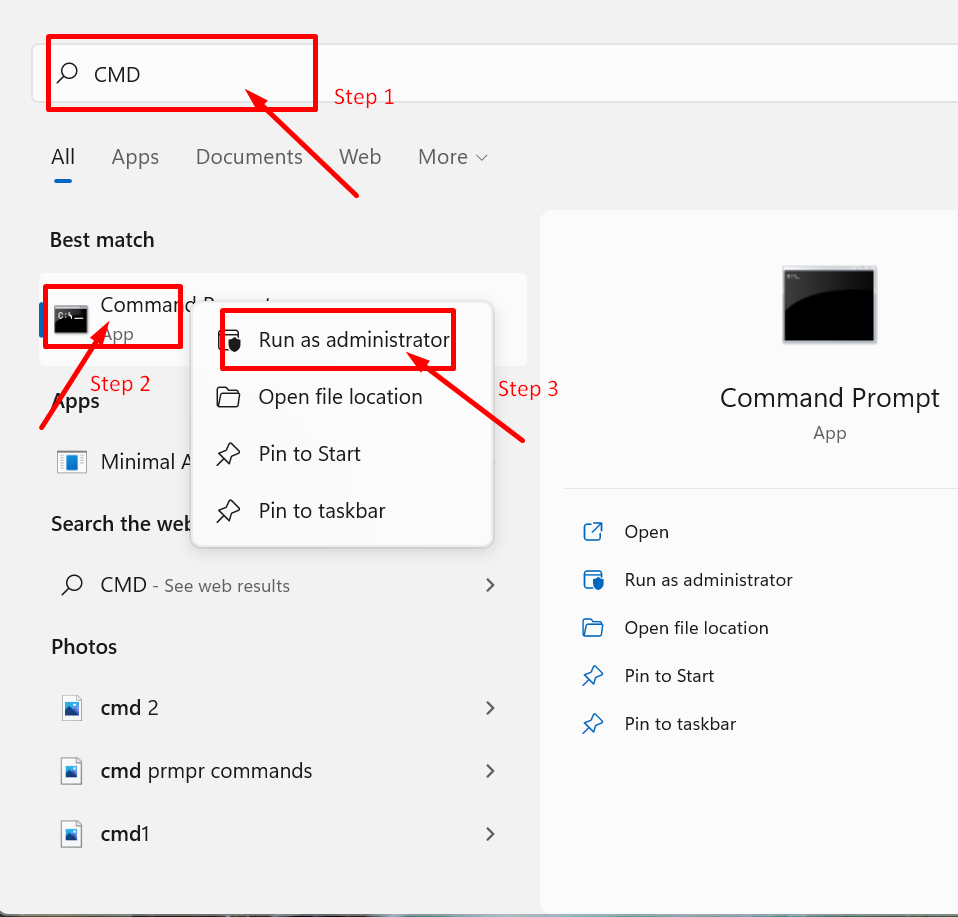
Now when the command prompts window pop-ups. You need to type the following commands to reset your current network settings.
Note: after typing each line you need to press enter and then proceed with another command line.
|
ipconfig/release ipconfig/all ipconfig/flushdns ipconfig/renew netsh int ip set dns netsh winsock reset ipconfig renew ipconfig renew |
This may look like this:
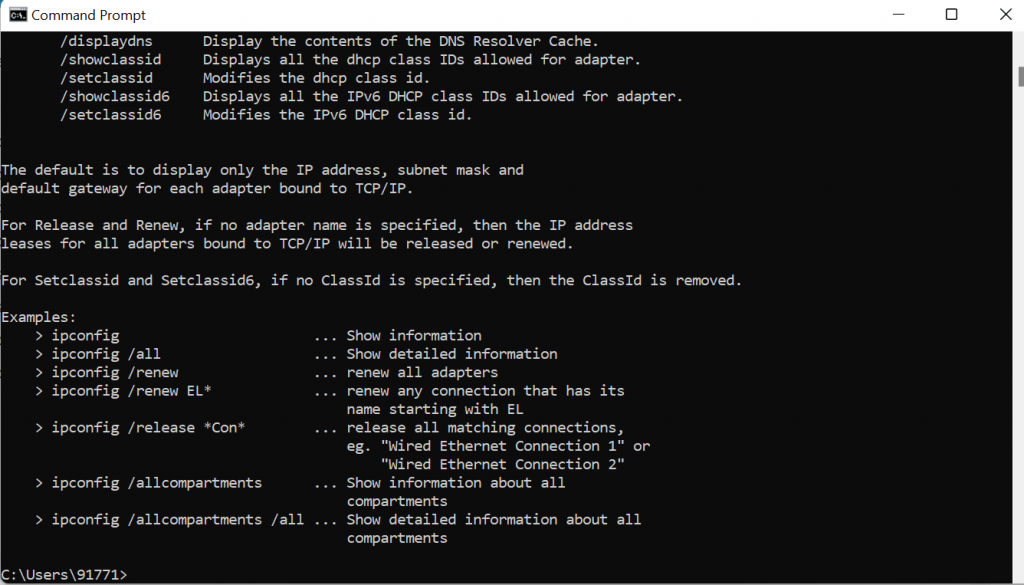
However, these things will be different if you are a macOS user. In mac machines in place of the command prompt, you are provided with Terminal App.
To begin with, you need to click on the Finder tab located at the top of the desktop, click on the GO tab >Applications.
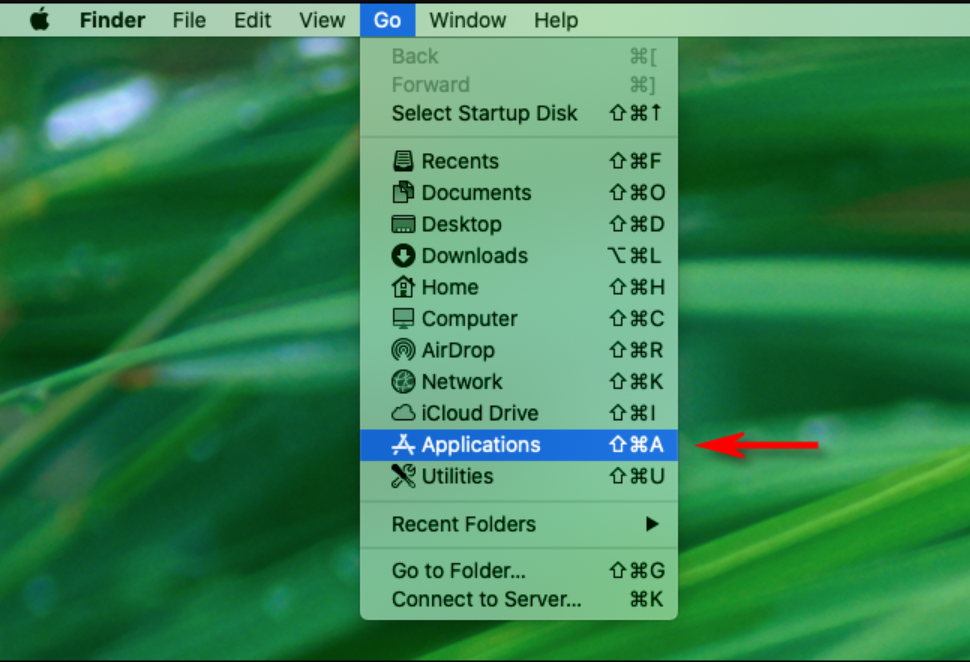
Immediately your Applications folder will open, navigate down the folder and find “Utilities”. Double click on it and you will find the terminal app as shown in the picture below:
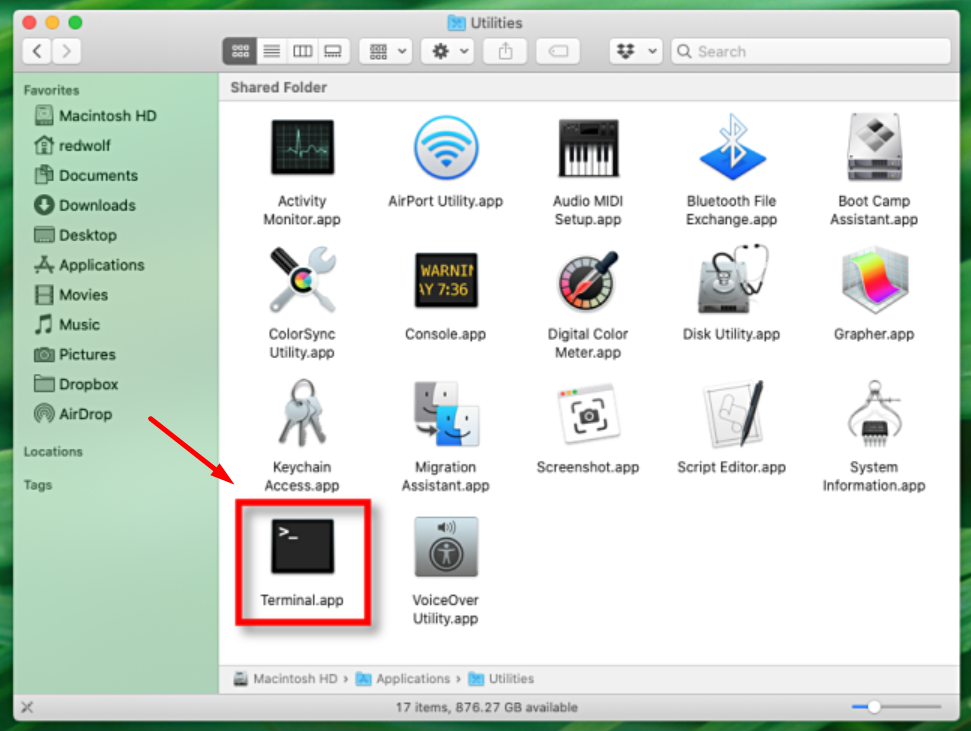
When you are successfully able to locate the Terminal.app, Open it and type the commands we have provided below, and hit enter to process.
|
dscacheutil —flushcache sudo killall —HUP mDNSResponder |
After this, you need to restart your machine to make changes effective. And check whether it can solve your issue or not.
6. change your browser settings
If you have come this far, it means you did not get success with the above-mentioned methods. And the issue may be in your browser settings. Let us see how you can change your browser settings and make things work.
To begin with, the process, go to your Chrome Browser > More Options > Settings, as shown in the picture for your reference.
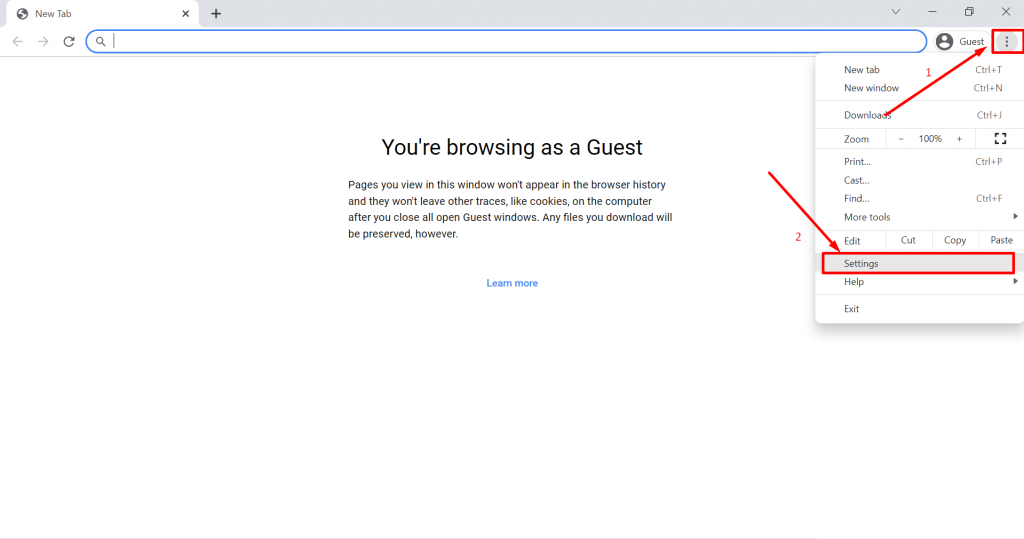
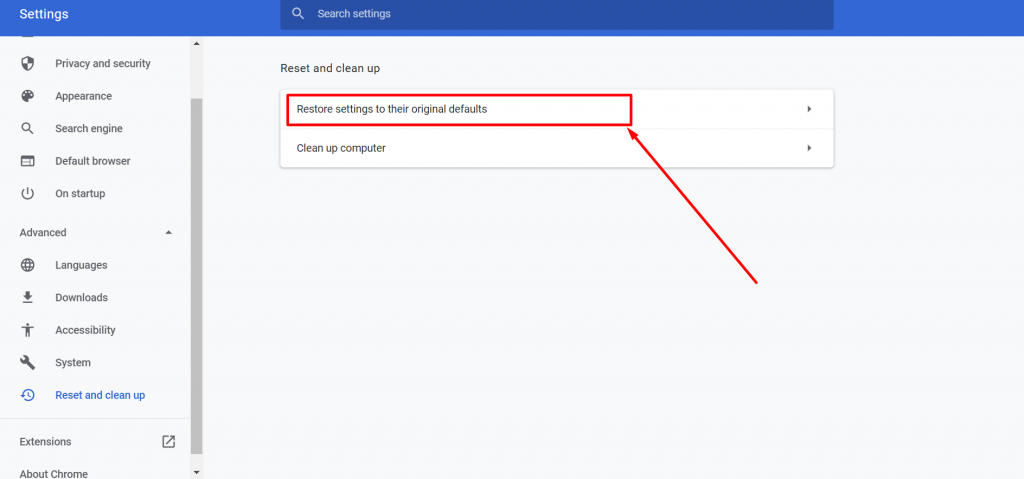
Now click on the Advanced tab followed by clicking on the Reset Settings tab as shown below:

Now you will be provided with two options to choose from. But you need to click on “Restore Settings to their original defaults” to restore settings to the default.
After a new window will appear on the same screen and you need to click on the “Reset Settings” button as shown below:
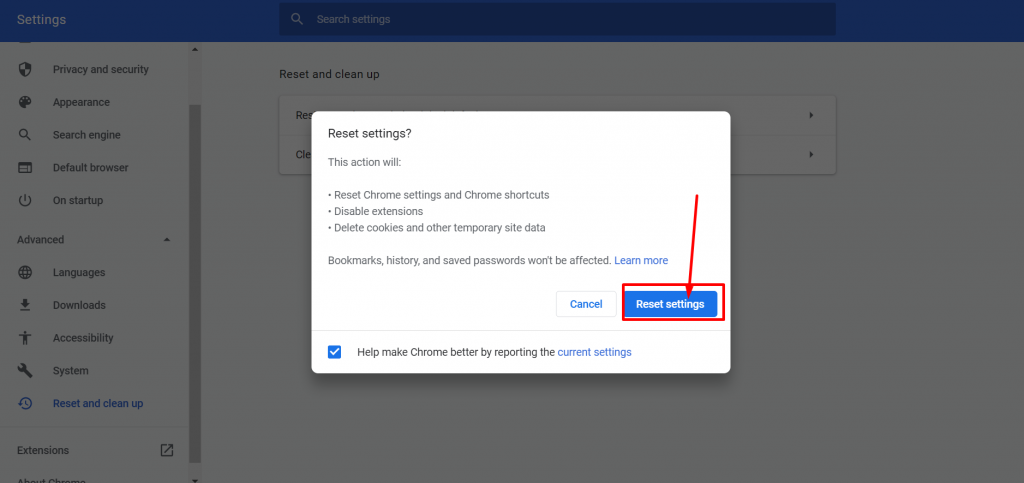
Now the last thing you need to do is to restart your Chrome and check if the error persists by accessing any website. However, if you are still getting the same error message, you can move on to the next method.
7. Set LAN settings to automatic
Sometimes, you use a VPN or Proxy to hide your location and forget about it for a while, which results in issues in your network connectivity. Hence, to avoid such scenes, you can set your LAN settings to automatic so that they will be easy for you to detect.
To begin with, the process, go to your Windows Search bar located at the bottom right of your computer screen and type inetcpl.cpl > Enter.

When you click on the inetcpl.cpl, a popup window appears. You need to click on the connections tab.
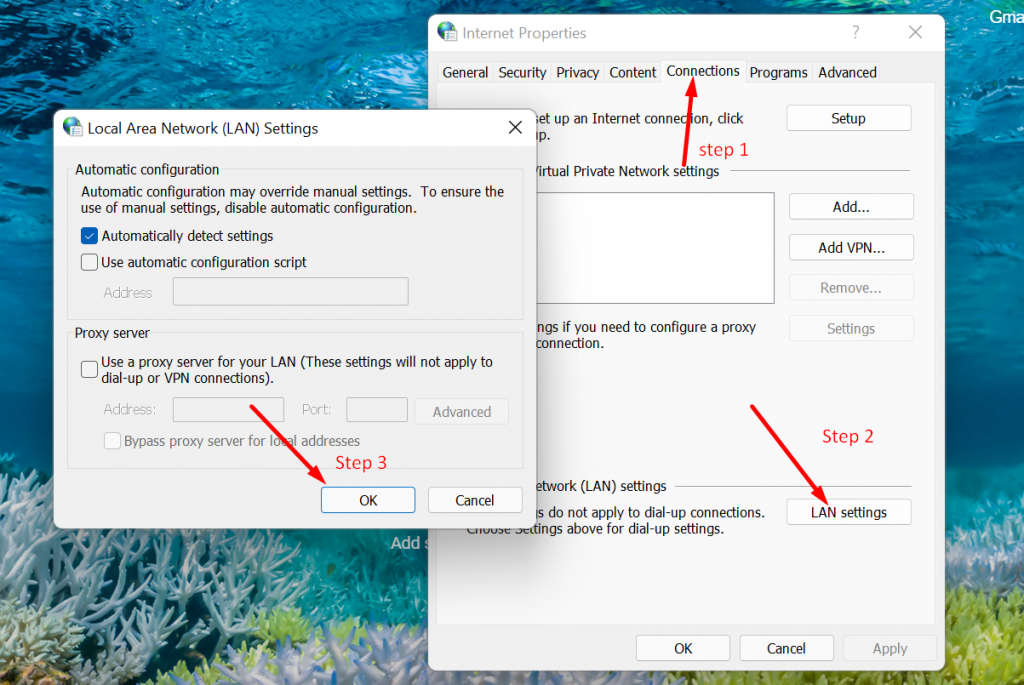
When you click on the connections tab, now you need to click on LAN settings located at the bottom of the tab. A new window appears in which you need to check the box for the “Automatically detect Settings option and finally click on the OK button to complete the process.
8. By changing the DNS settings on your Windows PC
This method is getting a little technical and requires a lot of steps, which can be a little confusing for any beginner. But it is an effective method that you must try if all the above methods fail to fix the DNS server not responding issue.
If you are a windows user, the first thing you need to do is to go to your Network Connections, Following the same process mentioned in Method 8.
On the View Network connections page, choose the connection you are currently using or active and right-click on it to reveal options. Select properties.

When you click on the properties, a new window will open, in which you have to select Internet Protocol Version 4 (TCP/IPv4), as shown in the picture below:

A new window of Internet Protocol Version 4 will appear and you need to select the option “Use the following DNS server address” to assign a different DNS address manually.

you can fill Google‘s public DNS IPv6 address in the Preferred DNS server as 8888 and the Alternate DNS server as 8844.
9. Try Disabling your Cache System
If you are not successful to eliminate the err_cache_miss error by using the above 8 methods, you can try this last and most efficient method to get your problem solved.
To begin with the process, first, you need to use Chrome’s Inspect Element feature, and to open it, you need to open the page you want to access, and on the same page right-click and select Inspect as shown in the picture below:
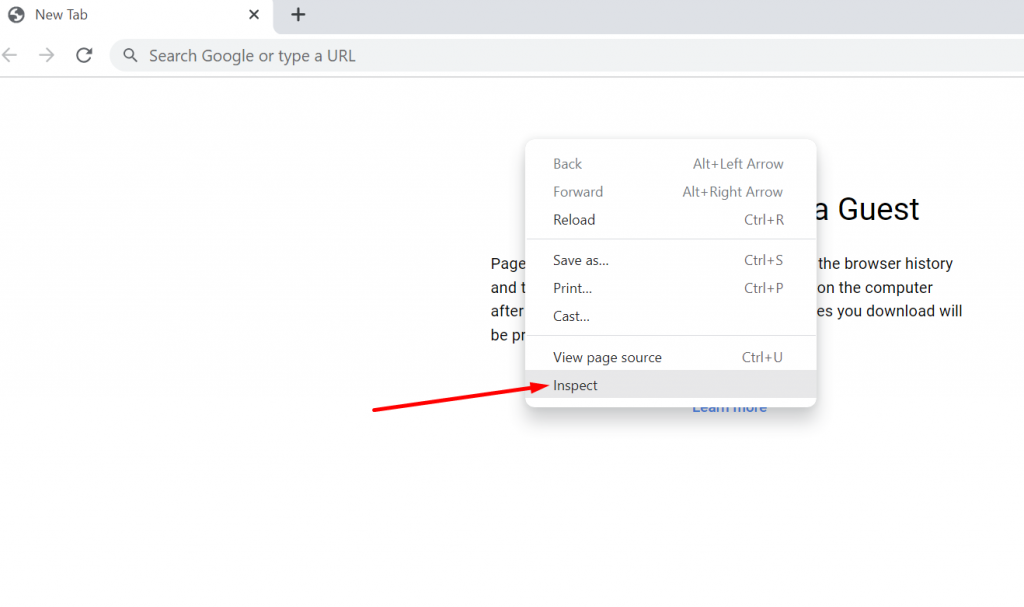
When you click on Inspect option, a panel will display on your screen. Now click on the Network Tab and check the Disable Cache box as shown in the picture below:

Note: One thing you must keep in mind is that you must Open the Develop tool or Inspect tool only on the page that shows the error.
Now reload the page, and see if the issue has been resolved or not? If not then you need to contact your Internet Service provider and follow the instructions they suggest.
For a Better, Reliable, and Fast experience, you can host your website on a WPOven Managed Web hosting Service provider, that provides you with the best VPS and Dedicated hosting solutions best in the market.
How to solve err_cache_miss android error?
For users who are experiencing err_cache_miss error on their android devices, Generally, the issue is triggered by the browser cache error. So, the easiest method you can follow to fix this issue is by simply purging the cache of your browser.
To do this,
Step1: Go to your android device, and long press on the browser for options.
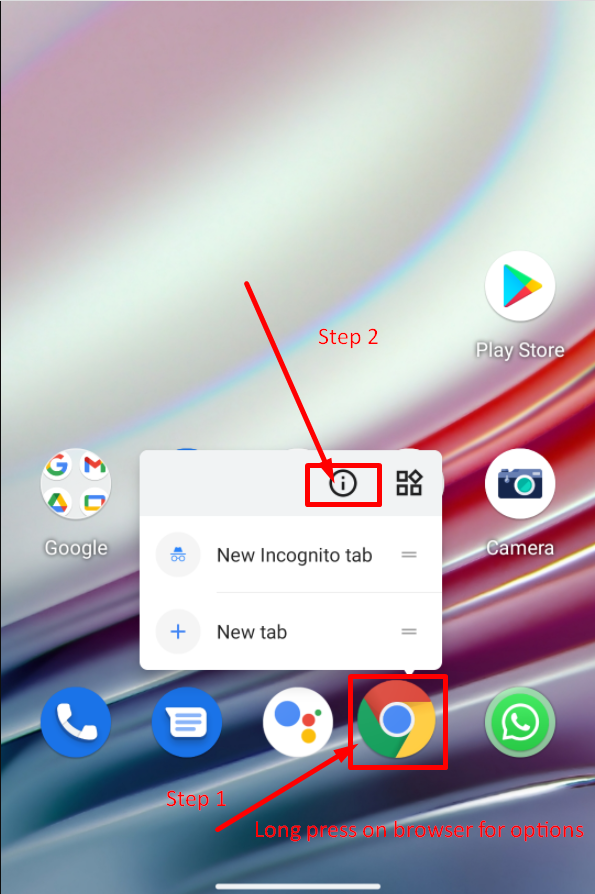
Step2: Select and click on the App info option as shown in the picture above.
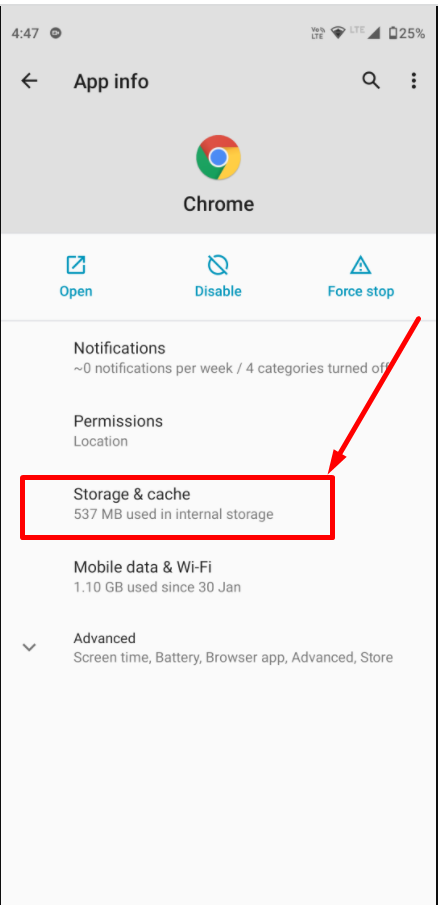
Step3: After that, you can see complete App information on your mobile screen, in which you need to select Storage and cache option as shown in the picture below:
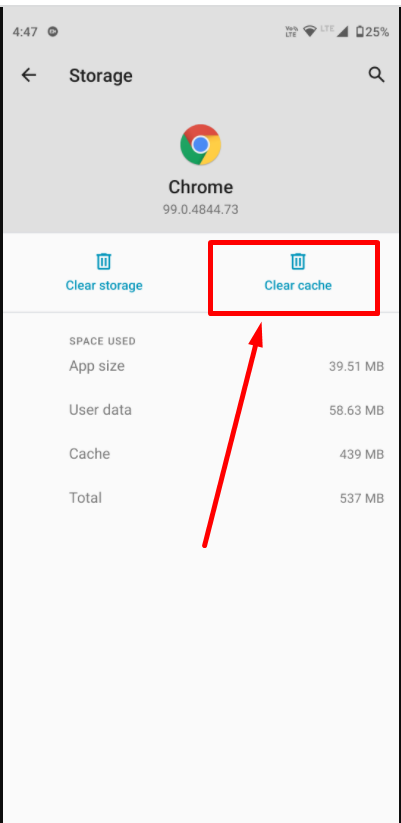
Step 4: Now click on the Clear cache button as shown and you are done.
Summary
Although, there might be multiple reasons to trigger or display ‘Err_cache_miss” errors such as corrupt extensions, DNS settings, browser settings, caching settings, Proxy settings, or many more. But the best part is, that there is always a solution for every problem. Similarly, with the right approach and best methods you can also solve this err_cache_miss error by following these quick and easy methods:
- Refresh/Reload the webpage
- Update your browser with the latest version available
- purge your browsing history or data
- Disable your Chrome browser Extensions
- Change or refresh your network settings
- Change your Browser Settings
- Set LAN settings to automatic
- By changing the DNS settings on your Windows PC
- Try Disabling your Cache system
If you have more effective methods to fix the err_cache_miss error, that we didn’t mention in this post, please do let us know in the comment section below.
Frequently Asked Questions
What is ERR_CACHE_MISS?
And from the name itself, these types of errors let you know what went wrong or what causes the problem. In the err_cache_miss error, you can see “err_cache_miss” error is generated due to some caching issue.
In addition to it, there are plenty of other reasons for generating the “err_cache_miss” error on your Chrome browser are:
1. When your browser is not getting cache files from the website you’re trying to open on your browser.
2. It is also possible that the web developer has not correctly coded the website or its PHP file has been damaged.
There can be some serious issues with your web browsers such as bugs present in browser extensions and improper browser settings.
How do I fix error cache miss?
you can also solve this err_cache_miss error by following these quick and easy methods:
Refresh/Reload the webpage
Update your browser with the latest version available
purge your browsing history or data
Disable your Chrome browser Extensions
Change or refresh your network settings
Change your Browser Settings
Set LAN settings to automatic
By changing the DNS settings on your Windows PC
Try Disabling your Cache system
How do I fix Google Chrome?
To fix Google chrome, the best things you can do are:
1. Restart or Refresh your Chrome web browser.
2. Free up the memory by closing all the tabs.
3. Delete browsing history or data and clean the cache as well as cookies.
4. Reset your Google Chrome settings to the Default original settings.
5. Update your Google Chrome to the latest version available.
когда дело доходит до серфинг в Интернете Мы потратили на это большую часть дня, это правда. Но бывают случаи, когда мы сталкиваемся с ошибками при просмотре, прокрутке или перемещении по веб-сайтам. Иногда мы думаем, что эти ошибки могут возникать из-за наличия проблемы с сетью или проблема с модемом Маршрутизатор. Но так бывает не всегда. Несколько пользователей недавно столкнулись с ошибкой под названием «err_cache_miss», и в этой статье мы предоставим вам способы ее исправить.
Люди используют разные поисковые приложения, чтобы завершить свою работу, но Google Chrome является одним из Наиболее часто используемые браузеры по всему миру. Это один из самых веб-браузеры обычно используется пользователями. Он всегда пытается внедрить новые функции, чтобы сохранить свою позицию. Но бесспорно, что многие люди сталкиваются с проблемами и с браузером Google Chrome. Ошибка ERR_CACHE_MISS В Chrome это одна из ошибок, с которыми сталкиваются многие пользователи во время Сидеть в сети.
Исправьте сбой страницы «Извините!» И другие ошибки загрузки страницы
Если вместо веб-страницы вы видите сообщение об ошибке «Извините» или другой код ошибки, Chrome не загружается. Вы также можете заметить, что страница загружается медленно или не открывается вообще.
Проблемы с загрузкой страницы и соответствующие коды ошибок
Следующие коды ошибок указывают на проблему с открытием страницы.
- «Извините!»: У Chrome проблемы с загрузкой страницы.
- ERR_NAME_NOT_RESOLVED: Имя хоста (веб-адрес) не существует.
- ERR_INTERNET_DISCONNECTED: Устройство не подключено к Интернету.
- ERR_CONNECTION_TIMED_OUT или же ERR_TIMED_OUT: Страница слишком долго подключалась. Интернет-соединение может быть очень медленным или страница слишком занята.
- ERR_CONNECTION_RESET: Что-то случилось, что отключило вас от страницы.
- ERR_NETWORK_CHANGED: Устройство отключено от сети или подключено к новой сети во время загрузки страницы.
- ERR_CONNECTION_REFUSED: Страница заблокировала подключение Chrome.
- ERR_CACHE_MISS: Информация, которую вы ранее ввели на странице, должна быть отправлена повторно.
- ERR_EMPTY_RESPONSE: Веб-сайт не отправил никаких данных и может быть недоступен.
- ERR_SSL_PROTOCOL_ERROR: Страница отправила данные, которые не распознаются Chrome.
- BAD_SSL_CLIENT_AUTH_CERT: Вход на веб-сайт (например, на веб-сайт банка или компании) не работает из-за неверного сертификата клиента.
У вас также может быть одна или несколько из следующих проблем:
- Сайт недоступен.
- Сайт не открывается.
- HTTPS-сайт не открывается.
- Изображение не может быть загружено.
- Невозможно открыть новую вкладку.
- Чтобы устранить проблему, выполните следующие действия по устранению неполадок.
Чтобы исправить эти ошибки, попробуйте следующие предложения.
Что ж, было замечено, что ошибка часто возникает при тестировании разработчик приложений Который содержит неправильный код, или иногда пользователь сталкивается с ним при просмотре определенных веб-сайтов.
Также было замечено, что эта ошибка «err_cache_miss» возникает только в браузере Google Chrome.
Ошибка «ERR_CACHE_MISS» появляется на экране, когда браузер не достигает точного веб-адреса или когда пользователь пытается повторно ввести данные поиска в этом браузере. Причин возникновения этой ошибки не так много.
Сразу на экране появляется сообщение: «Подтвердить повторную отправку формыИ дополнительное сообщение об ошибке: ERR_CACHE_MISS.
А теперь поговорим о том, почему это произошло.
Эта ошибка в основном возникает, когда в веб-браузере возникают проблемы с системой кэширования. Проблема с системой кеширования в основном связана с конкретным веб-сайтом или веб-приложением из-за неправильных кодов, в которых запрограммирован веб-сайт или приложение.
Итак, причина проблемы:
- Причина 1 Плохое программное обеспечение для веб-сайтов
- Причина 2 Некоторые ошибки в браузере могут привести к отображению страницы с ошибкой.
- Причина 3 Когда браузер не может получить файлы кеша с веб-сайта.
Err_cache_miss методы исправления ошибки
Мы можем быстро исправить эту ошибку, если вы знаете, чем она вызвана. Но если вы не видите причину, вы можете устранить ошибку, попробовав семь методов, перечисленных ниже:
Метод XNUMX — перезагрузить страницу
Это самый быстрый и наиболее заметный метод, который мы можем использовать при появлении сообщения. ERR_CACHE_MISS на экране компьютера. Если эта ошибка вызвана некоторыми сетевые проблемы Возможно, из-за плохого соединения, неправильного изменения сетевых настроек во время загрузки страницы и т. Д. Этот метод более эффективен и определенно работает. Вы можете прочитать наше руководство Лучшие инструменты для устранения проблем с сетью Чтобы получить некоторые идеи.
Чтобы перезагрузить страницу, просто нажмите клавишу F5 ; Также можно щелкнуть значок перезагрузки.
рядом с адресной строкой.
Если вы видите, что этот метод не очень эффективен и вам не подходит, значит, с вашей сетью проблем нет. Поэтому вам следует использовать другие методы, упомянутые ниже в этой статье.
Метод 2 — очистить данные браузера
Часто, когда мы просматриваем веб-сайты, к сожалению, мы загружаем некоторые файлы, в дополнение к этому мы также отменяем количество выполняемых задач. Подобное действие приводит к накоплению ненужных или поврежденных файлов и кеша в вашем браузере, что привело к появлению ошибки ERR_CACHE_MISS. Эту ошибку можно устранить, очистив данные этого типа в браузере. Для этого вам необходимо выполнить следующие шаги, чтобы выполнить задачу:
- Шаг 1: Сначала вам нужно будет нажать кнопку «Еще».
 расположен вверху справа.
 - Шаг 2: Далее вам нужно нажать на Дополнительные инструменты затем выберите Очистить данные просмотра.
- Шаг 3: Затем рядом с полем «Временной диапазон» выберите «За все время».
- Шаг 4: Выберите изображения, кешированные файлы, файлы cookie и другие данные веб-сайтов. Снимите выделение с других типов данных.
- Шаг 5: Далее коснитесь стереть данные.
- Шаг 6: Наконец, перезапустите ваш браузер.
Кроме того, этот метод также может исправить ошибку. ERR_INTERNET_DISCONNECTED в Chrome.
Этот метод работает в большинстве случаев, когда причиной ошибки являются поврежденные файлы. Если этот метод не работает, вы должны снова следовать методам, указанным ниже.
Метод XNUMX — отключение одного или нескольких расширений в веб-браузере
Иногда, когда веб-страница не может загружаться в браузере, это происходит из-за определенного расширения в браузере, которое заблокировало завершение процесса. Если вы знаете, что это так в браузере, то вам необходимо устранить проблему. Вы должны выполнить следующие действия, чтобы отключить расширение в браузере:
- Шаг 1: Прежде всего, вы должны нажать на кнопку «Еще».
 расположен вверху справа.
 - Шаг 2: После этого нажмите на опцию Дополнительные инструменты Затем нажмите на Дополнения.
- Шаг 3: Там вы увидите список надстроек, установленных в вашем браузере.
- Шаг 4: Сначала попробуйте отключить расширение блокировки рекламы, тогда ваша проблема будет решена.
- Шаг 5: Проверьте, решена ли проблема. Если нет, отключите также все другие расширения, установленные в вашем браузере.
Таким образом, ошибка будет исправлена. ERR_CACHE_MISS. Если этот метод не может решить эту проблему, не паникуйте, у вас есть другие способы справиться с этой проблемой.
Метод XNUMX — сброс сети с помощью командной строки
Когда возникает проблема с сетью, этот метод будет более продуктивным и исправит ошибку. ERR_CACHE_MISS. Вы можете установить сетевые настройки по умолчанию с помощью командной строки.
Вот шаги, которые вы должны выполнить, чтобы справиться с этой проблемой:
- Шаг 1: Прежде всего напишите CMD в поле поиска меню Пуск.
- Шаг 2: Затем выберите наиболее подходящий вариант, щелкните правой кнопкой мыши и выберите «Выполнить с правами администратора».
- Шаг 3: Затем вам нужно ввести следующие команды, одну за другой внутри командной строки:
ipconfig/release
ipconfig/all
ipconfig/flushdns
ipconfig/renew
netsh int ip set dns
netsh winsock reset
- Шаг 4: Перезагрузите компьютер.
Теперь настройки сети сброшены до значений по умолчанию. Если в вашей системе есть ошибки, вы не увидите ошибки ERR_CACHE_MISS больше на вашем экране.
Метод XNUMX — отключить кеш веб-браузера
Если все ранее упомянутые методы не работают, вам необходимо выполнить некоторые дополнительные действия в Google Chrome. Возможность отключить кеш — одна из них. Этот параметр помогает избежать ошибки ERR_CACHE_MISS. Вы должны выполнить следующие шаги, чтобы отключить кеш:
- Шаг 1: Сначала нажмите Ctrl + Shift + I за которым следует ключ F1. Откроется меню настроек.
- Шаг 2: Затем нажмите Option Отключить кеширование.
- Шаг 3: Затем перезапустите ваш браузер.
Этот метод поможет вам справиться с ошибкой ERR_CACHE_MISS. Но все же, если вы снова столкнетесь с этой проблемой, следующий метод исправит эту ошибку.
Метод 6 — используйте инструмент разработчика
Инструменты разработчика Это набор инструментов, доступных в браузере Chrome, который может Используйте это, чтобы исправить ошибки незначительный. Эти инструменты также используются для устранения ошибки. ERR_CACHE_MISS также. Итак, вам нужно выполнить следующие шаги:
- Шаг 1: Сначала нажмите Ctrl + Shift + I Открывает панель инструментов разработчика.
- Шаг 2: Затем из окна Инструмент разработчика , выберите вкладку Приложение из списка доступных опций.
- Шаг 3: Далее коснитесь Чистое хранилище Затем выберите веб-сайт, данные которого вы хотите очистить.
- Шаг 4: Затем нажмите Очистить данные веб-сайта.
- Шаг 5: Наконец, перезапустите ваш браузер.
Этот метод — один из самых эффективных. Что решает всевозможные проблемы.
Если какой-либо из описанных методов не работает для вас, вы должны использовать радикальный метод для решения этой проблемы.
Метод 7 — сбросить веб-браузер
Этот метод включает установку настроек по умолчанию для вашего браузера; Вы можете сделать это, выполнив следующие действия:
Шаг 1: Сначала щелкните значок «Дополнительно» ![]() затем выберите Настройки.
затем выберите Настройки.
Шаг 2: Затем нажмите Показать расширенные настройки.
Шаг 3: После этого нажмите Option Сброс настроек.
Шаг 4: Подтвердите свое действие, нажав кнопку сброса в окне подсказки.
Шаг 5: Наконец, перезапустите ваш браузер.
Различные случаи ошибки err_cache_miss.
- Я получил эту ошибку при доступе к некоторым веб-сайтам.
- Ошибка возникает при доступе к вашему личному или коммерческому сайту или интернет-магазину.
- Или вы получаете эту ошибку при использовании инструмента разработки Chrome.
Теперь, проанализировав и сопоставив один из приведенных выше случаев, вы можете получить наиболее подходящие шаги, указанные ниже.
1. У меня возникла ошибка Err_Cache_Miss при доступе к веб-сайтам.
Это одна из самых частых ошибок. Если вы слишком сильно пытаетесь получить доступ к группе веб-сайтов, а они не загружаются, вместо этого отображается сообщение об ошибке Err_Cache_Miss Затем вы можете попробовать следующие два метода для решения этой проблемы.
- Очистить данные веб-браузера Google Chrome — Да, очистка всех данных браузера Chrome может исправить эту ошибку. Это означает, что если в вашем браузере хранятся некоторые поврежденные файлы, такие как (файлы cookie, кешированные файлы). Так что, возможно, это причина ошибки. Чтобы очистить данные просмотра, вы можете установить их по умолчанию, введите —хром: // настройки / resetProfileSettings в адресной строке браузера, затем щелкните значок «Сброс настроек».
- Удалите панель инструментов и нежелательные расширения / блокировку рекламы. Иногда ошибка возникает при установке ненужных вредоносных панелей инструментов в веб-браузер. Поэтому вам нужно удалить их, чтобы решить эту проблему.
2. При доступе к вашему сайту у меня возникла ошибка Err_Cache_Miss.
Что ж, это не значит, что если возникает эта ошибка, значит, в коде вашего сайта есть ошибки.
Проблема может быть в веб-браузере Chrome.
Итак, сначала вам следует попробовать описанные выше методы, если только вы недавно не изменили свой веб-сайт. В этом случае просто отмените то, что вы сделали, и все будет хорошо.
мне Пользователи WordPress ، Err_Cache_Miss или нет.
3. У меня возникла ошибка Err_Cache_Miss при использовании инструмента разработки.
Если вы используете инструменты разработчика в Google Chrome, это сообщение об ошибке является распространенной проблемой.
Зачем? Просто из-за ошибок. Просто обновите браузер Chrome, чтобы решить эту проблему. После этого вы увидите, что эта проблема полностью исчезла.
Однако, если вы уже используете последнюю версию, вам нужно будет дождаться выхода следующего обновления. Помимо этого, вы можете попробовать некоторые из приведенных ниже методов.
Удалите ненужные дополнения Как мы уже упоминали в описанных выше методах, удаление ненужных расширений наверняка поможет вам избавиться от этой ошибки.
Отключить системное кеширование — Вы можете отключить системный кеш вручную при использовании Инструменты разработчика. Да, это правильно. Чтобы отключить кеширование системы, просто нажмите Ctrl + Shift + I затем F1 тогда выбирай «Отключение кэш-памяти (в то время как Devtools открыта). Затем просто перезагрузите веб-страницу, нажав Ctrl + F5, и все готово.
Заключение
Ошибка ERR_CACHE_MISS — одна из распространенных ошибок в Google Chrome. Существует не так много факторов, которые вызывают эту проблему в Google Chrome. Но плохие сетевые соединения иконфигурация системы и т.д. являются одними из общих элементов этой проблемы. Есть разные способы решить эту проблему. Каждый метод можно использовать в зависимости от его причины. Все методы очень полезны. Но инструменты разработчика — один из лучших способов.
Этот метод можно использовать для решения любых задач. Этот метод также можно использовать для решения других проблем, таких как Сайт недоступен В Google Chrome и т. Д. Эта ошибка не очень сложная; Все указанные методы подойдут вам. Но будьте осторожны, не используйте Любое другое приложение для решения этой проблемы?. Если проблема не исчезнет, вы можете установить альтернативный браузер, вот он Лучшие веб-браузеры на основе Chromium.
Главная » Интернет » Как исправить «Failed to load resource: net::ERR CACHE MISS»?

В данной статье я рассмотрю ошибку, которая появляется в Google Chrome. Решение простое и поможет вам очень быстро исправить проблему. Итак, появляется ошибка Failed to load resource: net::ERR_CACHE_MISS и страницы или страница отказывают загружаться. При заходе с другого устройства ресурс оказывается работоспособным, но не всегда. Такое еще бывает при вводе каких-то данных в формы, после чего появляется ошибка. Короче говоря, сейчас поэтапно рассмотрим методы исправления ошибки ERR CACHE MISS.
В данном случае нам нужно всего лишь очистить кэш браузера, это часто решает многие проблемы.
Запускаем браузер Google Chrome, нажимаем на три точки справа вверху (Настройка и управление Google Chrome).
Далее находим вкладку «Дополнительные инструменты», переходим в раздел «Удаление данных о просмотренных страницах». Либо просто нажимаем комбинацию «Ctrl+Shift+Del».
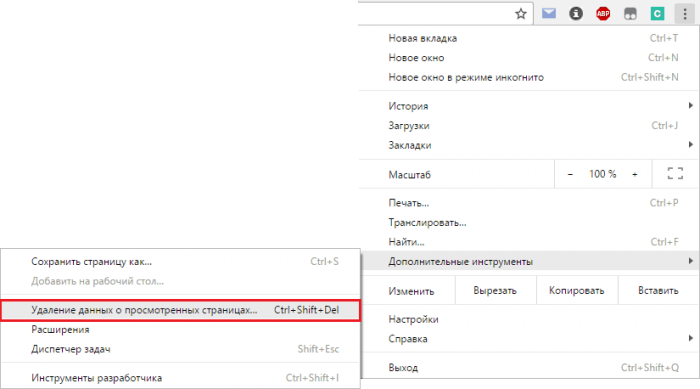
Откроется окно, где необходимо галочками обозначить следующее: Файлы cookie, а также другие данные сайтов и плагинов, и изображения, и другие файлы, сохраненные в кеше. Перезагружаем браузер.
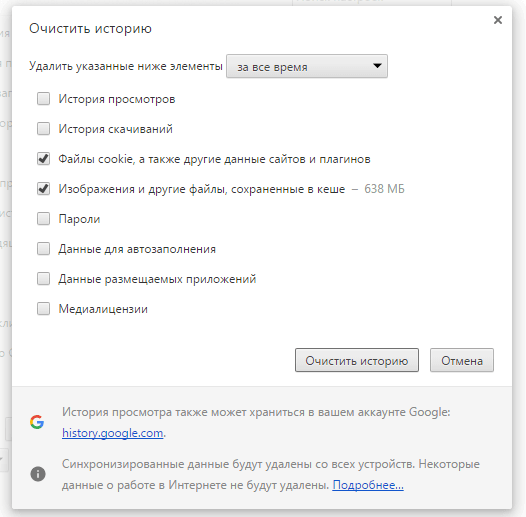
Это интересно: Как очистить кэш DNS?
Решение 2 «Использование командной строки для решения проблемы Интернета»
Нужно открыть командную строку с повышенными привилегиями, чтобы это сделать жмём правой кнопкой мышки по меню пуск и выбираем соответствующий пункт. При наличии у вас другой версии Windows, вводите в строку поиска из меню Пуск «командная строка» или «cmd», потом нажимаем мышкой по результату и выбираем «Запуск от имени администратора».
Теперь в командной строке нужно ввести вот это:
- ipconfig /release
- ipconfig /all
- ipconfig /flushdns
- ipconfig /renew
- netsh int ip set dns
- netsh winsock reset
Перезагружаем компьютер и радуемся.
Это интересно: Как очистить куки браузера (Cookie)?
Дополнительные решения
- Отключение Adblock
- Повторная перезагрузка страницы
- Обновление браузера до последней версии
- Переустановка браузера
- Перезагрузка компьютера и роутера
- Возможно у ресурса проводится техническое обслуживания. Стоит подождать
Вывод
Вышеуказанные решения могут исправить большинство распространённых ошибок Google Chrome и других браузеров. Если у вас есть какие-либо вопросы по поводу возникновения ERR_CACHE_MISS, то пишите в комментарии ниже.
Полезные статьи:
9 Способов ускорить Google Chrome
5 возможностей Google Chrome, о которых вы могли не знать
Google Chrome команды – 9 полезных команд
( 1 оценка, среднее 5 из 5 )
На чтение 6 мин. Просмотров 131 Опубликовано 18.04.2021
Пользователи могут столкнуться с ошибкой ERR_CACHE_MISS, сообщающей о повторной отправке формы. Обычно это означает, что просматриваемая веб-страница требует предоставления данных для продолжения. Иногда, когда вы уже ввели данные, их нужно ввести заново или будут использованы старые. Если эта ошибка повторяется, это означает, что проблема в вашем текущем браузере. Некоторые элементы в кеше могут быть непригодными для использования или некоторые конфигурации могут быть настроены неправильно. 
Мы можем выполнить некоторые проверки вашего браузера, чтобы убедиться, что эта ошибка исходит от вас. Если к концу устранения неполадок вы определили, что проблема не в вашем браузере, это означает, что эта ошибка возникла на стороне сервера веб-сайта, и вы ничего не можете сделать, пока разработчики не исправят ее там.
Содержание
- Очистить данные браузера
- Проверить расширения браузера
- Сбросьте настройки браузера
- Отключить повторную публикацию запросов
- Удалите строку кэша из заголовка PHP
- Обновите ваш браузер
- Отключить систему кеширования
- Сбросить настройки сети
- Протестируйте с другими браузерами
Очистить данные браузера
Мы можем попробовать очистить ваш данные браузера. Ваш браузер может содержать неисправные файлы, которые могут быть причиной проблемы. Когда мы очищаем данные браузера, все сбрасывается, и браузер ведет себя так, как будто вы впервые посещаете веб-сайт.
Мы перечислили метод очистки данных просмотра в Google Chrome. В других браузерах методы очистки данных могут немного отличаться.
- Введите « chrome://settings » в адресную строку Google Chrome. и нажмите Enter. Откроются настройки браузера.

- Перейти вниз страницы и нажмите « Advanced ».

- После раскрытия расширенного меню в разделе « Конфиденциальность и безопасность » нажмите « Очистить данные просмотра ». .

- Появится другое меню, подтверждающее, какие элементы вы хотите очистить вместе с датой. Выберите « начало времен », проверьте все параметры и нажмите « Очистить данные просмотра ».

- Теперь перезапустите браузер после завершения работы всех приложений, использующих диспетчер задач, и проверьте, доступен ли сайт снова.
Проверить расширения браузера
Если очистка данных просмотра не работает для вас, мы можем проверить, доступны ли расширения браузера. создавая проблему. Вы всегда должны отключать те расширения, которые, по вашему мнению, могут вызывать проблему. Мы по-прежнему рекомендуем вам отключить все расширения в браузере, прежде чем переходить к следующему совету, чтобы определить, кроется ли проблема в вашем браузере или на сервере.
Чтобы проверить расширения вашего браузера в Chrome, введите « chrome://extensions »в адресной строке и нажмите Enter.. Вы можете отключить любое расширение, сняв флажок «включить» . Это автоматически отключит это расширение от внесения каких-либо изменений в ваш пользовательский интерфейс. Перезагрузите браузер и проверьте.
Сбросьте настройки браузера
Если вышеуказанные методы не дали никаких результатов, мы можем попробовать сбросить настройки вашего браузера. Обратите внимание, что все ваши сохраненные конфигурации будут стерты, и браузер будет таким, как вы только что установили. Сделайте резервную копию закладок в свой профиль Google на всякий случай. Убедившись, что у вас есть резервные копии всех данных, продолжайте.
- Введите « chrome://settings » в адресной строке Google Chrome и нажмите Enter. Это откроет настройки браузера.
- Перейдите в нижнюю часть страницы и нажмите « Advanced ».
- Перейдите к внизу страницы и нажмите « Reset ». Появится новое окно с просьбой подтвердить свои действия. Нажмите « Reset » и подождите, пока ваш браузер перезагрузится.

- После сброса завершите все задачи Chrome с помощью диспетчера задач и попробуйте снова открыть веб-страницу.
Отключить повторную публикацию запросов
Если вы столкнулись с этой проблемой в Google Chrome, вы всегда можете указать Chrome воздержаться от удаления кэшированных данных с сайтов. Для этого:
- Щелкните правой кнопкой мыши ярлык Chrome на рабочем столе и выберите параметр « Свойства ».

- Выберите вкладку « Ярлык » сверху.
- Щелкните поле « Target ».

- В конце текста, написанного в поле, введите следующую команду с пробелом.
- disable-prompt-on-repost
- Нажмите « Применить », а затем « OK », чтобы сохраните изменения.
- Проверьте , сохраняется ли проблема.
Удалите строку кэша из заголовка PHP
В «Заголовке» есть специальная строка, если вы открыли форму в PHP-коде, эта строка сообщает браузеру не кэшировать данные с сайта. Поэтому на этом этапе мы удалим эту строку. Для этого:
- Заголовок в коде PHP обычно выглядит следующим образом.
header ('Cache-Control: no -store, no-cache, must-revalidate, max-age = 0 '); - Мы должны удалить « no-store , »Так, чтобы она выглядела как следующая строка.
header ('Cache-Control: no-cache, must-revalidate, max-age = 0'); - Сохраните изменения после редактирования и проверьте, сохраняется ли проблема..
Обновите ваш браузер
Прежде чем мы перейдем к отключению системы кеширования и сбросу вашей сети, попробуйте обновление вашего браузера до последней сборки. Проблема, с которой вы столкнулись, может быть исправлена в недавнем обновлении. Если обновление браузера не работает, перейдите к другим упомянутым методам устранения неполадок.
- Нажмите на три точки в правом верхнем углу экрана. Когда появится раскрывающийся список, нажмите « Справка » и выберите « О Google Chrome ».

- Chrome автоматически выполнит поиск доступного обновления. Если доступно обновление, оно будет загружено соответствующим образом. После загрузки вам будет предложено перезапустить браузер. Убедитесь, что вы сохранили все необходимое. Нажмите кнопку « Перезапустить ».

- После перезапуска проверьте, решена ли проблема.
Отключить систему кеширования
Мы можно попробовать полностью отключить систему кеширования и проверить, удаляет ли это сообщение об ошибке. Обратите внимание, что система кеширования будет отключена, пока открыт только режим разработчика. После закрытия система кеширования снова будет работать.
- Нажмите клавиши Ctrl + Shift + I , чтобы открыть режим разработчика. Затем нажмите F1 , чтобы сразу перейти к настройкам.
- Прокрутите настройки вниз, пока не появится опция « Сеть ». Установите флажок « Отключить кеш (пока DevTools открыт) ».

- После отключения кеша обновите страницу, не закрывая DevTools, и проверьте, успешно ли открывается веб-страница.
Сбросить настройки сети
Мы также можем попробовать сбросить настройки сети. Возможно, вы столкнулись с этой проблемой из-за неправильных сетевых настроек, сохраненных на вашем компьютере. Обратите внимание, что для выполнения этих действий вам потребуется учетная запись администратора.
- Нажмите Windows + S , чтобы открыть панель поиска. Введите « cmd » в диалоговом окне, щелкните приложение правой кнопкой мыши и выберите « Запуск от имени администратора ».
- В командной строке с повышенными привилегиями выполните одну за другой следующие команды.
ipconfig/release
ipconfig/all
ipconfig/flushdns
ipconfig/refresh
netsh int ip set dns
netsh winsock reset
- После выполнения всех команд перезагрузите компьютер и проверьте, решает ли это проблему.
Протестируйте с другими браузерами
Мы можем попробовать открыть веб-страницу в другом браузере. Если веб-страница не открывается и в другом браузере, это означает, что проблема не в вас, а в самом веб-сайте. Это будет исправлено разработчиками только на стороне сервера.
Примечание. Убедитесь, что сторонние брандмауэры или программное обеспечение для интернет-мониторинга неактивны. . Если это так, отключите его и попробуйте снова получить доступ к веб-странице. Также попробуйте перезагрузить маршрутизатор, отключив питание как минимум на 30 секунд.